Category: Recipes (Page 2 of 8)

Instant Pot – Cabbage and Onion

I should start by saying I love a cabbage and onion mixture!

It’s been a while since I pulled out the instant pot and used it to cook anything. The other day I noticed I still had a lot of little onions and a big cabbage that had been sitting in the refrigerator since the last grocery shop. I hate it when I spend good money on fresh produce and then let it get into old produce! The flavor is always compromised. I decided to saute the onions in a bit of olive oil. They were small onions, about golf ball size, so I just peeled and cut in half before lightly sauteing.cabbage and onions in the instant pot

Then I rough cut the cabbage in both directions and thru it into the instant pot. I also found a green pepper that was just a little past its prime, so I cut that up and added it to the pot.

cabbage and onion in the instant pot

cabbage and onion in the instant pot

Pretty Mushy Cabbage and Onion in the Instant Pot

cabbage and onions in the instant pot After I threw the onions into the mixture, I set the pot for 10 minutes on high. It took another 10 to 15 minutes to release the steam. So although it’s called an instant pot, it was more like 25 minutes total. The cabbage and onions were really cooked through. I think next time I’ll try only 8 minutes on high pressure to see if there is a little more crunch.

It’s been my experience with my instant pot that most everything is suitable for a soup after I get done with it. While that wasn’t my intention originally, the mixture of cabbage, onion and little bit of green pepper was great! Do you use your instant pot during the summer? Or are you more likely to use an air fryer? Let me know in the comments below.

Eating Zucchini from the Garden

I love fresh vegetables from garden, especially zucchini from the garden!

It’s fun to watch them grow and I don’t think you can eat much more local than that.

This year three little zucchini plants have really done well and I anticipate I’ll be making zucchini quite a bit later this summer. I’ve asked some friends in the Becoming Elli group to share their recipes me with because it’s easy to get too repetitious with a recipe.

If you’ve ever grown zucchini, you probably know that it all ripens at once! Although some of the ends of my baby zucchini have been nibbled by a deer, I don’t think they liked it because it wasn’t gone.  The deer have really feasted on the cucumbers, but I’m hoping the zucchini make it thru during the next few weeks. If they do, I will probably have between 15 and 20 zucchinis to make into something.

My usual way of eating zucchini when it comes in by the boat load:

  • zucchini bread (delicious, but of course, my recipe is with flour and sugar, so not the most healthy)
  • sliced rounds roasted in the oven with a little olive oil
  • zucchini spears diced in my favorite salad with vinegar, olive oil, dill and basil
  • shredded zucchini

I’ve heard of zucchini lasagna, but I’m not sure I’ve ever made it. It’s probably much like eggplant lasagna. Basically, you substitute sliced vegetables for the pasta noodles.

Please leave a comment below with a zucchini recipe that you enjoy. I appreciate it!

My Roasting Eggplant in the Air Fryer Experiment

If you Google how to roast eggplant in the air fryer, you will discover a lot of recipes. Trust me on that. I found lots of different recipes for roasting eggplant, even when I limited my search to using the Air Fryer.

I asked in the Becoming Elli Facebook Group (join us there if you haven’t already!) if anyone had any good ideas on what to do with eggplant. People made many suggestions so I have ways to prepare eggplant for a while. I also checked for other eggplant recipes in this site and found one recipe that Chris posted. It sounds good too so I may add that to my list of ways to prepare eggplant.

Roasted eggplant was one of the more popular suggestions so I decided to give that  a try. I love most roasted vegetables so I thought roasted eggplant would probably also be good.

Once I started researching the best way to roast eggplant, I found the one dividing point between cooks.  Salting the vegetable before cooking or not.

Eggplant has a lot of moisture in it. Typically if you’re making eggplant parmesan or some other Italian eggplant treat, you’re instructed to salt the slices of eggplant to draw out the moisture.

Some of the recipes for roasting eggplant insist the only way to get crips eggplant is to salt it first and remove the moisture. Other recipes said it doesn’t matter and you can skip that step.

The other discrepancy between the roasting methods was about removing the skin first. Some recipes said to peel the eggplant before cooking and other recipes said to keep it on.

To Salt or Not to Salt

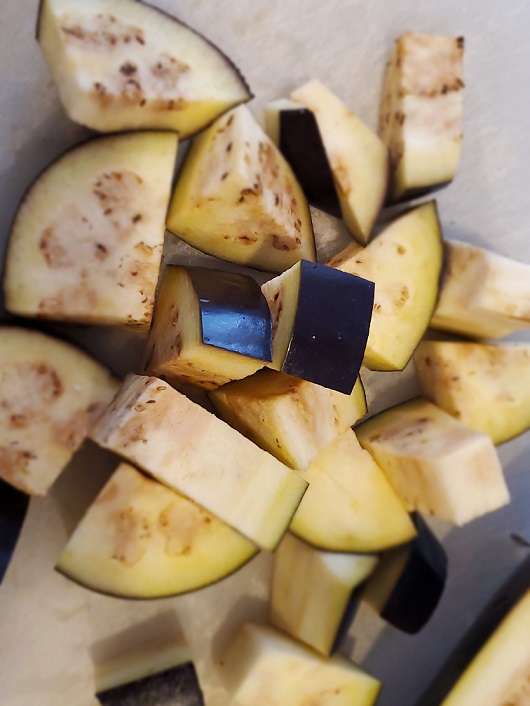
I decided to try both methods of roasting. I cut one eggplant into cubes and cooked half at a time.

To make sure I was conducting a fair experiment, I kept everything the same with both batches. I used the same oil and the same spices for both batches. However, I sprinkled salt on one batch and let it sit for about 30 minutes. The second batch I roasted without bothering with the salt.

I decided to leave the skin on the eggplant because my inclination with all vegetables is to leave the skin on if possible. For one thing, it’s a lot easier not to peel a vegetable before cooking. Secondly, it seems that for most vegetables, there’s more vitamins and fiber if you keep the skin on the vegetable.

Easier and better for you? Let’s try keeping the skin on the eggplant.

Roasting the Batches

For each batch of eggplant, I used about a tablespoon of avocado oil and then sprinkled on a mixture of spices. I used pepper, garlic powder, oregano, and a pinch of red pepper. Because I knew one batch would already be salted, I did not add salt to the spice mixture.

I roasted the first batch (the unsalted one) in the air fryer at 400 for about 15 minutes. I shook them up a couple of times while cooking. When they came out, the pieces were very dark so I thought I had burnt them. It turned out that they were fine but just had a dark color.

The second batch sat in a colander with the salt on for about thirty minutes. I stirred them occasionally to help remove any moisture. When I was ready to roast them, I wiped the salt and moisture off the eggplant chunks, and then prepared in the same way as the first batch.

I did cook the second batch for a couple of minutes less than the first batch. I thought I had burnt the first batch so wanted to try for a slightly shorter time.

Results

By the time the second batch had finished cooking, I had eaten most of the first batch. I forced myself to leave some so that I’d have them when the second batch finished. You can see in this photo how much I ate in the 12 minutes the second batch cooked. (The second batch is on the left. I know, they should have been on the right.)

The second batch was also good but did have a saltier flavor than the first batch. I was glad that I had not put any salt in the spice mixture.

I did not notice any difference in the crunchiness of the eggplant. Based on this small experiment, I would say you can safely skip the salting and wiping off part of the process.

And what about the skin?

The roasted eggplant became very soft so the only real crunch was from the skin. I really liked it. I thought the roasted skin added some great texture to the dish.

The result was that I ate an entire eggplant as a snack in the middle of the afternoon. It was delicious.

Roasting Eggplant in the Air Fryer

So here’s the simple recipe I used for the eggplant.

Ingredients

Eggplant

Oil

Spice Mixture. Use what you want for this but I used about 1 teaspoon each of oregano and garlic powder, ½ teaspoon of black pepper, and a scant 1/8 teaspoon of cayenne pepper.

Cut the eggplant into about one-inch cubes.

Toss them in about a tablespoon of oil. I used avocado oil but olive oil would work well.

Mix the spices together and then toss with the eggplant cubes.

Add the eggplant to the air fryer.

Roast at 400 for about 12 minutes. Stir at least once, halfway through the cooking.

These were good hot, right out of the air fryer, warm, and at room temperature.

They weren’t around long enough for me to try them on salad or any other dish.

I’m still open to other ideas for eggplant but I absolutely loved the roasted eggplant.

If you have any suggestions about roasting eggplant in the Air Fryer, other ways to cook eggplant or roasting other type of vegetables for me, be sure to share them with me.

Spicing Up My Bland Vegetable Soup

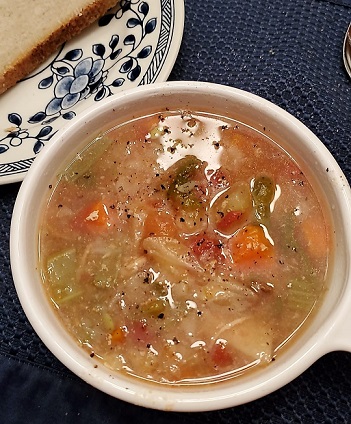
I made a pot of vegetable soup the other day using my Instant Pot. My son and daughter-in-law were coming to visit and I wanted to have soup since it was one of the first cooler days of fall. I was rushed and just sort of threw the soup together. It wasn’t bad but it was rather bland. It definitely needed some spicing up.

Here’s how I made the soup. I used:

  • Onions
  • Carrots
  • Celery
  • Cabbage
  • Potatoes
  • Chicken
  • Can of diced tomatoes
  • Chicken broth

Because I was rushed, I didn’t sauté any of the vegetables before adding the other ingredients. I decided it didn’t really matter.  The Instant Pot was full, almost overly so. I cooked the soup and served it up right away when my guests arrived.

I shouldn’t have been surprised but the soup was bland. It wasn’t bad but it sure wasn’t the best soup I’ve ever made.

Ideas for Spicing Up My Bland Vegetable Soup

I asked for advice on the Becoming Elli Facebook Group on spicing up my bland vegetable soup. Here’s the list of suggestions I received.

RustySue said to try Sriracha. That would add some kick, for sure.

Souza recommended adding carmelized onions. I wouldn’t have thought of that. I definitely wouldn’t have had the patience for this batch of soup but it’s great advice for a later batch.

Janet said she uses a veggie juice like V8 as the broth in place of water. I remember using V8 in the past but had forgotten about it. It’s a good way to add some flavor to the soup.

A couple of spoons of basil pesto was suggested by Karen. I would never have thought of that but it would be a nice addition.

Sherry had a suggestion that I could use on the bowl of soup. She said, “top it with some garlic bread croutons and feta cheese!” I think this would have been a great addition to my soup.

Spice Recommendations

Beth recommended adding bay leaf or cumin. I had both of those in my spice cabinet. That would have worked.

Lisa suggested garlic and lots of salt.  I didn’t have garlic cloves but could have used garlic powder. I definitely under-salted the soup.  Lisa said she’s learned that salting more heavily really brings out the flavors in food.

A little tomato sauce, garlic, salt, and bay leaves while cooking was Patty’s recommendation.

Barbara said, “I add a beef billion cube, oregano, basil and garlic.” That would definitely spice up the soup. The bullion usually adds a lot of sodium so you get a lot of salty flavor.

“Six pepper, sparingly”, Laureen said. She added, “It adds flavor, a little heat.”  I did not know this spice blend so I had to look it up. It’s a spice blend made up of a mix of black and white pepper, red and green bell peppers, plus chili peppers. I suspect this would be a fantastic way for spicing up bland vegetable soup.

A suggestion made by MiMi was to add curry. This is a great reminder that I have a cabinet full of spices and that I could simply rummage around in it and find some easy ways to spice up any dish I’m making.

Bobbie’s answer was turmeric and cayenne pepper. For a while I was a big turmeric fan. I added it to a lot of things but then got out of the habit. I do like to use cayenne pepper too.

Start at the Beginning

Kathy provided a detailed response:

I always find it difficult to season a soup after it’s been made, I usually try to add no sodium type flavors in the very beginning – you might try beginning with a bit of olive oil in the pan and adding just a few red pepper flakes, let cook a minute, then add onions until translucent, during this time, add pepper, paprika, a bit of garlic powder and if you want to kick it up a bit, cayenne pepper, or cumin depending on the flavor profile you like, cook for a minute or so, then begin to make your soup, see if this helps.

I think that is good advice.

Nourishing Slow Cooked Vegetable Soup

Sue passed on a link from the Women Living Well after 50 website for a great sounding vegetable soup. I like the recipe and thought adding ginger was a fantastic idea.

Conclusion

After reading everyone’s suggestions, I’m now much more prepared to make a zestier vegetable soup. Also, I realized that our private Facebook Group is a great source of ideas. I just bought some greens and can’t decide what to do with them so I guess I should go to the Becoming Elli Facebook group and ask for advice.

Do you have any suggestions for spicing up my bland vegetable soup?

Salmon and Sardine Patties Recipe

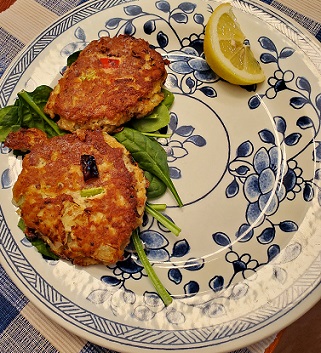
I love salmon patties. They’re quick and easy and taste great. I was trying to figure out how to get more sardines into my diet. I had a number of cans of sardines in my pantry so it made sense to use them but also sardines are supposed to be good for you. Sure, salmon is too but I find it harder to work sardines into my eating patterns. I’ve written about this before so I guess it’s an ongoing challenge for me. This time I wanted something warm for dinner, not a sardine salad so I came up with the idea of salmon and sardine patties.

Because we’re doing the 2021 Veggie Challenge, I wanted to be sure to add some vegetables to this. Normally I would have used only onion but this time I used diced onion, celery and red peppers. I also added ground flax seeds because flax seeds are rich in fiber, nutrients, and omega 3 fats. I often look for ways to get flax seeds into my diet.

Salmon and sardine patties

Ingredients

1 can salmon (6 oz.)
1 can sardines
2 eggs, whisked
1/4 cup diced onion
1/4 cup celery
1/4 cup red pepper (You can add more vegetables or remove some of these.)
1 tablespoon Dijon Mustard
1 tsp Garlic powder
1 tablespoon ground flax seed
Salt
Pepper
Avocado oil or olive oil or oil of your choice
Spinach
Lemon slices

Directions

Salmon and sardine patties

Prepare patties:

Drain both cans of fish and fork into a small mixing bowl.

Add eggs and mix.

Blend in the diced vegetables, mustard, garlic powder, flax seed, salt and pepper.

Mix well and then form patties.

Refrigerate patties for half an hour or longer.

When ready to cook the patties, heat oil in cast iron skillet or non-stick skillet.

Add the patties to the pan.

Cook patties for several minutes until browned and then flip and brown on the other side.

Salmon and sardine patties

Serve on bed of spinach or other greens with slices of lemon.

A side salad or other vegetable completes the meal.

I think you’ll find this to be a delicious, easy dinner to make. It’s versatile and tastes good. You can add or delete as many vegetables as you want.

Green Goodness Salad Dressing

You’re going to like this Green Goodness Salad Dressing.  I recently reviewed the Wild About Greens cookbook by Nava Atlas and thought I would try to make something out of the cookbook.

I chose to make the Green Goodness Salad Dressing. As you can see in the photograph, this dressing is a gorgeous green color. It’s just lovely.

Green Goodness Salad Dressing

1/2 cup extra virgin olive oil

2 good handfuls of baby spinach leaves

1/2 cup peeled seeded and chopped cucumber

1/2 cup firmly packed fresh parsley

Two tablespoons lemon juice

Two tablespoons white or red wine vinegar

One tablespoon chopped fresh dill or one teaspoon dried dill

Freshly ground pepper to taste

Place all ingredients in the container of a food processor. Process until all that remains of the parsley is tiny flakes.
refrigerate the unused portion in an airtight container. Use within 2 days.

The cookbook says that this is a delicious dressing for grain or bean salads. It’s also tasty drizzled on lightly cooked or roasted vegetables.

Green Goodness Salad Dressing

Wild about greens, by Nava Atlas. Publisher is Sterling publishing,
Copyright 2012

This was about the easiest recipe to make. Just throw the ingredients in the food processor and turn it on. In seconds, you have a gorgeous salad dressing. It tastes good though I will confess that I added a bit of sea salt. I thought it needed it. That’s certainly personal preference though.

I continue to try to find new ways to prepare a variety of greens and this is a good addition to the repertoire. We’re still doing the 2021 Veggie Challenge and I think this recipe qualifies as a hit.

Chris posted a recipe for a Veggie Blender Dressing a while ago and this reminded me of that. I wonder how this compares to her dressing.


Food and Activity during the Ides of March

Mid-March is a fun time of year for me. The 15th is called the Ides of March (which is supposed to be a warning, but I don’t heed it!) This past week has been very enjoyable. It feels like the beginning of spring and the end of winter.

Lots of changes with the weather has brought cold sunshine or unexpectedly warm, windy days. I’m looking forward to more outside activities in the coming weeks!

Walking More

ides of march spring is in the airJill and I had an opportunity to walk outside and catch up in person! Of course we wore our Becoming Elli masks, since we are still in the end stages (hopefully) of the COVID-19 pandemic here in Ohio. ides of march feathers I enjoyed seeing lots of birds flying while I was visiting at my mother’s house. I believe that these feathers are from giant buzzards that were circling above her pine trees and yard!

These are huge birds that return to the area and traditionally have a festival in their honor each year.

Veggie Challenge

ides of march roasted eggplant

I sliced eggplant long ways and roasted it in a 400 degree oven for 20 minutes. Then I substituted the eggplant strips for about half of the lasagna noodles that normally go into lasagna. Gives a great taste, but cuts calories and adds veggies!

In trying to keep up with the #2021VeggieChallenge, I made an eggplant casserole the other day using turkey instead of beef and roasted eggplant in place of half of the lasagna noodles. Delicious!

ides of march peppers and onions

I sauteed onions and chopped peppers to layer into the lasagna.

The cheese and tomato sauce still made it taste/feel like eating lasagna, but I definitely added veggies, while at the same times was able to cut some simple carbohydrate calories. I added a lot of chopped yellow, orange, red peppers and a whole large sweet onion. It was great.

Unfortunately, I forgot to take a photo of the end result! But this tiny piece that is left, is testament to how good it was!

ides of march eggplant lasagna

This photo of the last piece, really doesn’t do it justice!

ides of march veggie salad

Quinoa is technically a seed (but is classified as a whole grain) that I sometimes use to substitute for rice. It packs lots of protein, about 8 grams in one cup.

Because I had a little bit of eggplant left over, the other day I scrapped the middle part out and put it into the blender along with some cauliflower, broccoli and carrots. After whirring it around a bit into small pieces, I took it out of the Vitamix and added the mixture to some cooked quinoa. Because everything was about the same size, it really had a nice texture. I added a little dressing to my veggie/quinoa salad and used it as a side to my eggplant lasagna. I really enjoyed this type of salad and will definitely make it again.

How’s your veggie challenge going? Are you able to get outside to enjoy more activity?

A Variation on the Frittata

I decided to provide you with a variation on the frittata. Chris posted her pepper frittata recipe the other day and she motivated me to cook one for my lunch. I took the opportunity to capture my version of the frittata and thought I’d share it here.

Because I used a pan that could go into the oven, I decided to go ahead and throw the frittata under the broiler. I didn’t have to do that but it gave everything a nicely browned topping.

One of the things I love about making a frittata is that you can save the leftovers and enjoy them the next day. It keeps and reheats well.

Another great thing about frittatas is that you can use whatever vegetables you have on hand. It’s a great way to use up some of those vegetables sitting in your refrigerator.

My Variation on the Frittata Ingredients

Avocado oil or butter or olive oil. Go with what you prefer.

Eggs. The more eggs you use, the larger your frittata is. I used six eggs but probably could have added a couple more.

One clove of garlic, minced.

Chopped vegetables. I used onion, orange and green peppers, kale, and zucchini.

Parmesan Cheese. That’s the only cheese I available and it worked well. You can use other cheeses if that’s what you have. I think Cheddar or mozzarella would work well. Next time I’ll try goat cheese.

My Variation on the Frittata Directions

Pre-heat the broiler.

Heat the oil in a medium to large frying pan that can also go into the oven.

Add all of the vegetables except for the zucchini and saute until soft. Add the garlic and cook an additional minute or so.

Variation on the Frittata

Move the cooked vegetables into a bowl to keep.

Whisk the eggs in a separate bowl.

Reduce the temperature of your stove.

Add a bit more oil to your  if needed and pour in the whisked eggs. Let them sit so the bottom begins to set.

Gently add the cooked vegetables over the top of the eggs.

Add the zucchini over the eggs and cooked vegetables.

Variation on the Frittata

Sprinkle the cheese over the top and let cook just a bit longer. When the bottom seems cooked and the top is starting to set, move the pan to your broiler.

Let the dish sit under the broiler for a few minutes. Keep a close eye on it to avoid burning the frittata. Remove it when the top is nicely browned and the cheese is melted.

Leave the frittata in the pan for a few minutes to cool and then slide onto a cutting board or serving dish. Let it cool a bit more and then cut into generous slices.

You can enjoy your frittata warm or at room temperature.


Quick and Easy Vegetable Ramen Soup

When I’m talking about quick and easy vegetable ramen soup, I don’t mean the cheap packets of ramen I used to buy for a very cheap meal. Though I suppose you could certainly use those noodles to make this soup and they would work just as well. I don’t know about those packets of seasonings though. They may be a bit suspect.

I bought a large package of gluten-free organic millet and brown rice ramen noodles at Costco. They’re quick and easy to make and here’s my take on a quick and easy soup.

In one of our recent podcast episodes, Chris and I discussed this year’s veggie challenge. Chris said she was cheating because she was using large bags of frozen vegetables to get in those extra servings of vegetables. I said making something easy isn’t cheating. So, this recipe is one of those. I bought a giant bag of stir-fry vegetables (also from Costco) and used that in this recipe.

I also bought a box of broth called Ramen broth. It’s very good. I did not buy it at Costco but at a regular grocery store.

You could add some hot sauce to the broth or a bit of sesame oil. The Ramen broth was good so you don’t have to add anything unless you want.

I added some cooked chicken to the soup as a protein source but you wouldn’t have to do that. You could probably add some cubed tofu if you wanted a vegetarian option or just omit the protein all together.

Quick and Easy Vegetable Ramen Soup

Feel free to make any changes you want to this. It’s basically a quick, throw-together kind of soup.

Ingredients

2 cups Ramen Broth

1 brick of Millet and Brown Rice Ramen

2-3 large handfuls of frozen stir-fry vegetables

1/2 cup chopped cooked chicken

Directions

Heat the broth in a medium saucepan.

Add the frozen stir-fry vegetables and let simmer for 5 to 10 minutes.

Stir in the cooked chicken.

In a separate pan, bring water to a boil. Add the brick of ramen noodles. Cook for about four minutes. Follow the directions on the package. Drain noodles and place in a serving bowl.

Ladle the broth and vegetables over the noodles and mix.

Enjoy the soup! If you haven’t achieved the perfect ratio of broth to noodles, feel free to add some more broth and vegetables to the remaining ramen noodles.

This is a very quick and easy vegetable ramen soup. If you try it, let me know what you think.

Spices Help Me to Maintain a Healthy Weight

Spices help me to maintain a healthy weight because foods that I normally don’t particularly like, taste very appealing.

During the winter months this can be particularly important to me as it seems like I feel more hunger, even when I’m not really hungry. Perhaps it is the cold… or boredom… or longer nights. I’m not sure why.

Adding spices to my recipes and food prep has really helped me to stay on track.

I thought I’d share some of these in case it might help someone else as well.

Spices that help to Maintain a Healthy Weight

Garlic and Cayenne Pepper – Two spices that add a lot of flavor without adding any calories… Garlic is great for starting many recipes (like when you’re sauteing minced onion, celery and green peppers.) Cayenne Pepper gives a kick to bland foods. My problem is that I don’t really like the flavor of each of these, so I go very sparingly if at all. I only start with these two because they are GO-TO spices for many people and I think most people like them.

Dill – I often use dill in my salads and it reminds me of spring and summer. It tastes great with vinegar based dressings. I often use it in my veggie potluck salads. And I love to add dill to jazz up boiled cauliflower. The small green herb adds color to the otherwise white dish.

Pumpkin Spice – In the fall, it seems like half the world turns to pumpkin spice. Roasted acorn squash or roasted butternut squash is amazing with this spice added to it. For a dessert treat, I blend frozen bananas with a little bit of this and sometimes I even add a bit of a can of pumpkin for added fiber. I like to make my own with just some ground cinnamon, ground ginger, ground nutmeg, ground allspice, and ground cloves. Here’s a link to a recipe for pumpkin pie spice and you’ll end up saving some money when you make your own. Jill makes her own pumpkin pie spice.

Salt/Pepper – This seems so basic, it barely requires mentioning, but I’d be remiss if I didn’t. I try to limit my salt, even though my blood pressure is almost always more low than high. I think too much salt masks the flavor of food, so I don’t add it while I’m cooking, but generally a small shake just before I eat the food helps to bring out the flavor.

Oregano and/or Basil – I love to add these to most things with tomato in the recipe. Sometimes I’ll pair them together, sometimes just oregano. I usually smell each of these spices to see if that’s the flavor I want. It’s funny, when I’m cooking I can’t remember these two flavors unless I smell them first. Most of the other spices, I can see the name and almost taste it in my mouth, just by reading the name. For some reason I struggle with mixing up oregano and basil. We often grow basil plants in the summer and bring them inside in the winter. You’d figure I would know and remember this spice better!

Turmeric – I like to add these to my scrambled eggs. The favor isn’t very strong, but supposedly turmeric helps with inflammation in joints. Be careful with this one, yellow stains will appear on fingers or clothes if you get too wild with the turmeric.

So how do these spices help with weight maintenance?

When I use spices, I’m cooking from scratch. I’m not opening a box of something that is pre made. Just that alone, by using real whole foods more and using processed foods less (or not at all) really really helps me to maintain a healthy weight. So many premade foods have fructose corn syrup or other things that I really need to avoid.

By focusing on the favor of the spice, I happily anticipate more homemade recipes and foods that have dense nutritional value.

Are you interested in making more of your own spices? Check out this handy downloadable PDF to make your own spice mixes from the NDSU Extension – Nutrition site. (Thanks Brenna!)

How about you? Do you use spices to enhance your foods? Which spices did I miss and how do you use them? Leave a message below or send me an email at Chris@becomingelli.com.

« Older posts Newer posts »

© 2026

Theme by Anders Noren — Up ↑