Category: Recipes (Page 3 of 8)

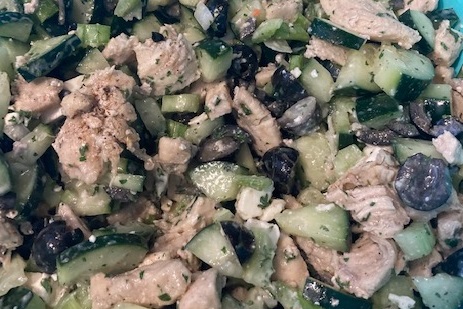
Chicken Cucumber Olive Salad

I am loving my new creation of cucumber chicken salad!

What is your favorite way to make Chicken Salad? I have found that I really like having chicken salad made with cucumbers, olives, a little celery and onions.. and just a bit of cheese. Sometimes I’ll put in Parmesan cheese, other times feta cheese.

I’ve also made this type of cucumber chicken salad by adding a lot of broccoli slaw, but I end up really dicing the broccoli slaw a lot so that it doesn’t have a large ribbon of broccoli. I think it fits better with the bite size pieces.
cucumber chicken salad cucumber chicken salad with olives

Spices I like are dill and parsley with a little bit of regular salt and pepper as well. This time I just used lemon juice and vinegar – the same juices as I used to cook the chicken breast in the crock pot before making the salad. No waste!

The cucumbers make this cucumber chicken salad part of the #veggiechallenge for me because it helps me eat some delicious vegetables without even really thinking about it.

Please let me know your favorite chicken salad recipe! Is it with or without cucumbers and olives? Leave a message here or email me at Chris@becomingelli.com

Tracking Food is Making Me Aware

There is no question that tracking food and water helps me to be more aware of what I’m eating.

I notice that I consciously switch to a lower calorie choice or delay making a choice when I’m keeping track.

Since I recently started keeping track of the amount of water I drink and tracking what I am eating I have noticed these changes:

  • Snacks have been fruits – granny smith apples, bananas, frozen berries
  • I’m choosing more lean chicken breast for the protein
  • I prep food more often
  • I go back and look at prior days to find out what works
  • Putting together the grocery list seems easier, more purposeful
  • Tracking gives me another routine to the day (which helps me to separate the days during the sameness of the pandemic.)

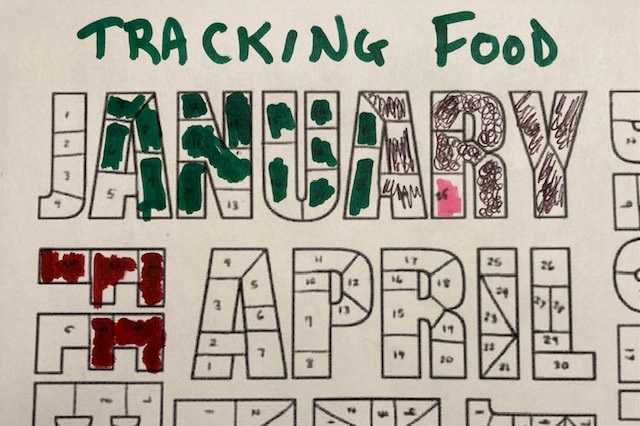
I really wouldn’t think that all that comes from just tracking food, but I notice one step leads to another. I track my food in an app on my phone that shows calories as well as the macros, but I track that I’ve tracked my food each day by filling in a little piece of the coloring page that was posted on our Facebook Group by one of our members.

Healthy Swaps: 

I am definitely drinking more water because of tracking my food. With the cold temperatures, my furnace has been working over time and forcing hot dry air in the house. I know I feel better with the right amount of water and it is noticeable.

Another positive change – when I actually enter the food into the app before I eat it, I often make a slight switch to a different ingredients, or en drop something all together.

This has lead to an “AH-HA” moment. I think I am going to try to re-frame my thoughts about cooking. Instead of thinking about having “leftovers”, I’m going to think about cooking as “meal prep.” Meal prep to me means making something that is not for the immediate next meal. I usually think of cooking as the step for eating. Having a “meal prep” readily available – (I almost wrote leftovers! this is going to take a while!) – is handy to have ready when I need to pack a lunch or dinner. Doing meal prep when I’m not hungry is something that I really enjoy.

The other benefit is when I make food myself, I know exactly what is in it. Much easier for tracking food.

While becoming more aware, I noticed something else about my attitude. It’s surprising to me that I enjoy cooking, because normally I don’t. The difference? I make more things when I am not hungry. Food prep on a full stomach, instead of a watering mouth, makes more sense. Perhaps I hit on a good key for me to learn and enjoy some new recipes. Seems like a simple thing – probably something that everyone else learned many years ago – when they learned to cook. It’s eye opening to me, but probably a “duh” to you all.

I took my time and played some music, got all the ingredients out first. Last night I made some more stuffed green peppers and cabbage rolls. Because the stuffing in both is so similar, I made plenty of the filling. This time I tried adding a secret ingredient: water chestnuts! tracking food with cabbage rolls and green peppersIt bulked up the ground beef/onion/rice filling and gave me another vegetable for the 2021 Veggie Challenge! Best of all, even after baking they still give a bit of a crunch.

Three Words:

Food prep and food tracking is another activity I want to encourage in my life. Finding the time to prepare food and fit it into my schedule takes a little planning. Every day that I track food helps to strengthen my resolve.

There is still a long way to go for my activity to be considered real exercise, which is what I had in mind when I selected that word. At this stage of winter, activity in the right direction of good health is a considered a win.

Thanks to one of our members in the Becoming Elli Group for posting this great idea to track my tracking food habits!Daily Monthly Yearly Tracking Food tool This tool is working for me. I love the motivation and inspiration from the group!

How are you doing with your plans for yourself this year? If you have a goal, resolution, or three words – maybe a training plan, action plan or other tool, let me know how you’re doing! Leave a comment below or email me at Chris@BecomingElli.com

Stuffed Cabbage Rolls

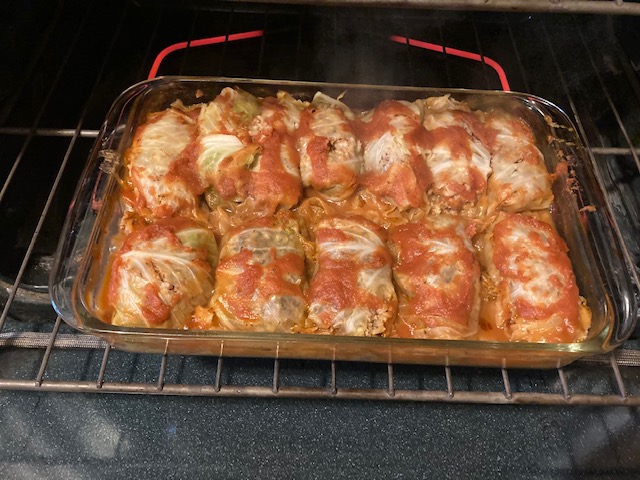
This recipe for Stuffed Cabbage Rolls is made from cabbage leaves and is sometimes called “Pigs in the Blanket” or “Rolled Cabbage.” I know if I call it Pigs in the Blanket, most people think of those little hotdogs in a rolled up piece of dough… This is NOT that recipe. I’m not sure when that name turned into hotdogs, but somewhere along the way I missed it! I was born in western PA and grew up in northeast Ohio, where this was called Pigs in the Blanket at potlucks or other gatherings. It really is rolled up cabbage leaves stuffed with rice, veggies and meat, covered with tomato sauce. Now you can go wild making this into a major process where you cook your own sauce and spend lots of time on the stuff part of the cabbage. I like to keep it simple. stuffed cabbage rolls recipe

Here’s my recipe for Stuffed Cabbage Rolls:

Ingredients: cabbage, onion, brown rice, hamburger, tomato sauce. (Some folks also use sausage and I think that’s the pig part of the name pigs in the blanket. I prefer beef instead of pork, but that’s just me!)
  • Core the cabbage. Peel off leaves as big as possible.
  • Steam the leaves. (Some people freeze the cabbage and then let it thaw. I’ve never tried that.) I actually boil leaves in water while I’m cooking some brown rice. Remove the cabbage leaves when they are pliable. I use tongs because they are hot. Set aside and let them cool.
  • Pour tomato sauce in bottom of 9×13 pan. I used about a third of a can of Hunts traditional tomato sauce.
  • Cut up the cabbage core and the little left over parts of cabbage that didn’t come out as good leaves… chop into bite size pieces, cook in the water. When they are a bit translucent, lay them on top of the tomato sauce. This uses up the rest of the head of the cabbage.  The bottom of the dish is lined with the cooked cabbage.
  • Drain any left over water. Chop and cook the onion until translucent and put into a bowl. After rice is cooked combine the chopped onion, cooked brown rice and raw hamburger. Salt and pepper.  Add a little less than a third of the tomato sauce to mixture.
  • Now it’s time to make the blankets. Use tongs to remove cabbage leaf. Spread on a cutting board and trim that little hard part of the stem so it will fold easier. Make a small oval ball of rice/onion/beef mixture and place on on leaf. Wrap leaf around the hamburger rice onion mixture.
  • Line pan with the pigs in the cabbage blanket.
  • I figure about 12 cabbage rolls for one cabbage, depending upon how big my cabbage was.
  • Pour remaining sauce on top. Cover with tin foil.
Bake at 375 for about an hour. Uncover for about 15 more minutes to brown. After you take it out, let it rest for a few minutes so it can cool a bit before serving. Delicious!! Remix: Here’s a different version of the same recipe with just a few changes. different version of stuffed cabbage rolls Another time I made these cabbage rolls, I really upped the veggies. Instead of adding just an onion, I used a whole bag of frozen green and red peppers with onions. I chopped up the frozen veggies and mixed that in with the meat and rice. I also added an egg to hold it together better. This made more filling so in turn it made more cabbage rolls. The last few rolls were actually made up of pieces of cabbage leaf, because all the whole leaves were gone. I also used some toothpicks to hold the tin foil off the cabbage rolls. So do you ever make this? What do you do differently?? Leave me a message at Chris@becomingelli.com or in the comments below.

Creamy Vegetable Soup in the Instant Pot

I came up with my version of creamy vegetable soup in the Instant Pot.

I was out of town unexpectedly recently and left with a refrigerator full of vegetables. When I got back, I realized that I needed to use some of the produce quickly or I was going to have to throw it out. It was more than I could eat in one sitting so I tried to come up with a creative solution.

We’ve shared a variety of vegetable recipes on this site. Chris shared a recipe for vegetable soup. I didn’t have enough variety of veggies to make her recipe so had to come up with something different.

Creamy Vegetable Soup in the Instant Pot

Here’s the recipe I created. I used the Instant Pot for this though I suspect you could make this on your stove top. This ended up being a quick and easy recipe that was came out well.

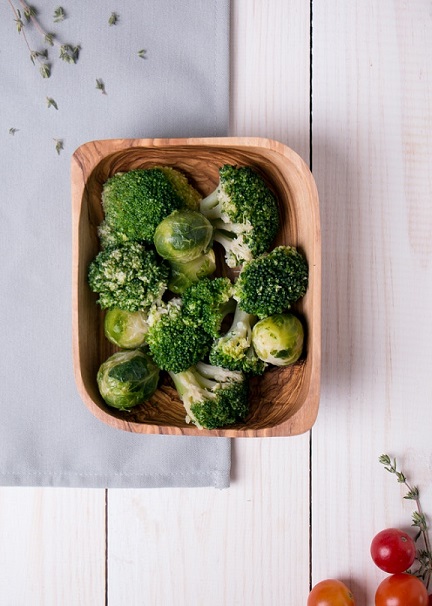
I took the head of broccoli and chopped it roughly into large pieces, including the stalks. There was a bag of Brussels sprouts that needed to be used so I cleaned them. I ended up with about a pound of broccoli and a half pound of Brussels sprouts.

I think you could switch out the vegetables to something different. Perhaps a squash and carrots would be good. Cauliflower added with either the broccoli or the Brussels sprouts would be good.

Experiment with different combinations of vegetables for a variety of quick and easy soups.

I put all the ingredients in the Instant Pot and set it for 10 minutes.

I think you could make this soup with any number of vegetable combinations.

Ingredients

1 pound chopped broccoli

1/2 pound Brussels sprouts

½ yellow onion, chopped

4 cloves of garlic, chopped

1 tsp ground ginger (fresh ginger would be great)

Salt \

Pepper

1 can coconut milk

1.5 cups of chicken broth

Juice of half a lemon

Directions

Put everything in the Instant Pot. Set the Instant Pot to 10 minutes. Let it release naturally.

Use an immersion blender to cream the soup. Or put the soup in a heavy duty blender (I use a Vitamix) and blend. Take the center piece out of the lid and cover the lid with a towel.

Toppings

If you have toppings, go ahead and add them to the bowl of soup. I used raw pumpkin seeds. They worked well. You could probably use croutons or a bit of coconut cream or pine nuts. Toppings aren’t necessary but they do add a bit of crunch to the soup.

Creamy Vegetable Soup in the Instant Pot

Making Coconut Yogurt in the Instant Pot

I figured out how to make coconut yogurt in the Instant Pot. It’s easy though it does take some time.

I’ve been trying to eat more fermented foods and when we talked with Christine Bailey on a recent podcast, she said yogurt was a great option. She also recommended coconut yogurt if you are not eating dairy.

I’ve been avoiding dairy for a few months because a doctor suggested that some of my skin problems might be related to dairy. Like most of us, I  love certain dairy products. Cheese, sour cream, cream in my coffee. I love all of that. But eliminating all of that has helped me feel better.

I do like yogurt. For a long time my go-to breakfast was plain Greek yogurt with berries and some granola on top. It was a tasty breakfast.

Buying coconut yogurt in the grocery store is extremely expensive. And it all has some kind of sugar added to it period at least that seems to be what’s true at my local grocery store. No one seems to make plain coconut yogurt.

I suddenly remembered that my instant pot has a yogurt making option on it so I decided to try making my own coconut yogurt.

Making Coconut Yogurt in the Instant Pot

My first batch turned out pretty well but was rather runny. Coconut milk apparently is lacking some protein or something that causes milk yogurt to thicken. I ended up mixing it in my Vitamix with a little bit of vanilla extract and raspberries. It was a lot like the drinkable yogurts that you can buy in the grocery store. It tasted really good.

Second Batch

My second batch is a bit thicker because I added a teaspoon of unflavored gelatin to it.

As the starter for the yogurt I used plain Greek yogurt. I know it’s dairy but I figured the small amount that I added to the coconut milk is not going to hurt me. I’m not allergic to dairy. I’m just trying to avoid it to help my skin heal.

You can buy yogurt starter but buying a small container of yogurt at the store is a lot cheaper and easier. Now that I’ve made some yogurt, I can save a bit of it to use as a starter for the next batch. It’s like having a sour dough starter. Once you have some, just save it and keep using it as a starter.

Coconut Milk

I used a can of organic full fat coconut milk. I don’t know how light coconut milk would work. Definitely avoid the coconut milk that comes in a cardboard container. You want to use the canned milk.

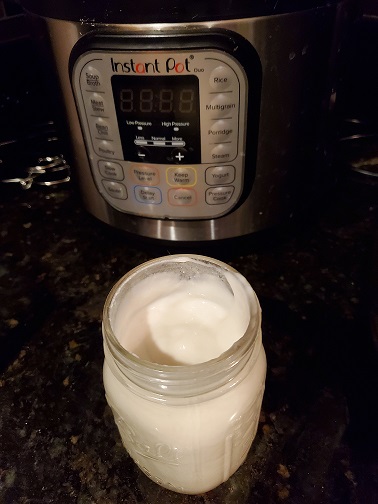
I added the yogurt starter and a teaspoon of the unflavored gelatin and whisked it well. I then poured it into a mason jar, which I put in the Instant Pot. Then, I added some water to the bottom of the pot, put the lid on, and then set the yogurt time to 24 hours. I figured that would let it really ferment.

After the fermentation ended and I removed the jar from the Instant Pot, I put the yogurt in the refrigerator to let it set for several hours.

When the yogurt was set, I stirred the yogurt thoroughly.

The coconut yogurt does not have a strong taste of coconut. As a treat or for my breakfast, I add some berries and a little vanilla extract but I am not big on adding sweetener. You certainly could if you wanted. You could also sprinkle some granola or chopped nuts on top for crunch.

Recipe for Coconut Yogurt in the Instant Pot

This is so easy, you’ll love it.

Ingredients

1 can of full fat coconut milk

1 tablespoon of Greek Yogurt with active cultures

2 teaspoons of unflavored gelatin (just use 1 teaspoon if you don’t want it too thick.)

Directions

Empty the coconut milk into a small mixing bow.

Add the Greek yogurt and the unflavored gelatin. Whisk well.

Pour the mixture into a mason jar or small bowl.

Place the jar in the Instant Pot.

Add one cup of water to the Instant Pot.

Select yogurt on the Instant Pot and then select time. I went with 24 hours to get a tangy flavor.

When it finishes, shake or whisk the yogurt well, cover, and put in the refrigerator. Wait several hours or even a day and then mix well again. Enjoy!

Notes

Make sure your mason jar or glass bowl are clean. I washed the jar in the dishwasher immediately before using.

Many yogurt instructions say to boil the milk first but because I was using canned coconut milk, I determined that was an unnecessary step. If you decide to do this, be sure to boil the coconut milk first and then let it cool before adding the Greek yogurt and gelatin.

If you make coconut yogurt or any kind of yogurt in your Instant Pot, let me know how it turns out.

Miso Ginger Noodle Soup

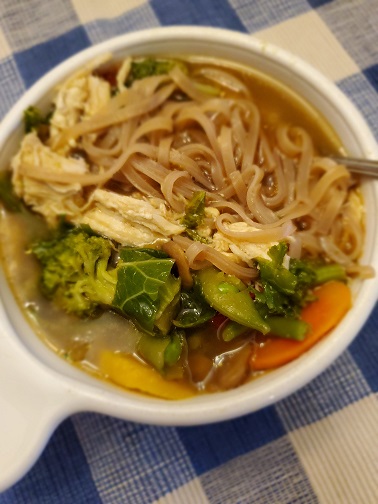
It’s fall here in Ohio and my heart has turned to soup. My Miso Ginger Noodle Soup is a great soup and very easy because I used convenience foods to make it. I know we’re always talking about not using prepared foods but I think this worked out well.

The miso-ginger stock that I used was something I bought at Trader Joe’s. It’s fantastic. I used to buy regular miso there but they no longer carry it. (At least right now. You never know what they’ll carry or discontinue.) I had intended to make my own miso stock but this was convenient and tasted great.

I had a bag of frozen stir fry vegetables so I decided to use that. Rummaging around in the refrigerator uncovered some cooked chicken that was ideal to add to the soup. Finally, I had some rice noodles in the pantry that I decided to include.

Miso Ginger Noodle Soup

This soup is fast and easy to make.

Ingredients

1 cartoon of miso Ginger broth ( I bought this at trader Joe’s but you could of course make your own broth.)
1 square Vietnamese brown rice noodles
3 cups Frozen stir fry veggies (whatever you have on hand works)
1 cooked boneless chicken breast, chopped or shredded
Dash Sesame oil (optional)

Directions

Pour the whole carton of miso ginger broth into a large saucepan and place on medium heat.

Add the frozen stir fry vegetables and kale and bring to a simmer.

Simmer for several minutes, until the vegetables are heated and the kale is wilted.

Add the cooked chicken and cook until heated through.

Cook the rice noodles according to package directions. Stir the dash of sesame oil over them for a bit more flavor.

Put some noodles in the bottom of a bowl and ladle soup over them.

Enjoy!

Notes for Making Miso Ginger Noodle Soup:

You could use whatever vegetables you have on hand. The stir-fry vegetables worked great.

Adding some sauteed onions would be fantastic.

If you use spinach instead of the kale, add the spinach at the very end since it takes much less time to wilt.

I recommend cooking the noodles separately so that if you have leftovers, the noodles won’t turn into mush.

Let me know if you make this. Share a photo if you have one.

Brussels Sprouts and Kale Salad

I came up with this Brussels Sprouts and Kale Salad to help celebrate the fall season. Fall is a great time of year for the hardier vegetables like Brussels sprouts and kale. I went to make lunch the other day while my daughter-in-law was visiting and said, “I know. Let’s make this salad I’ve been thinking about.” We both enjoyed it and we both had some ideas on how to improve it.

It’s been quite a while since I posted about my cruciferous crunch salad. This is in the same vein but has a simpler dressing and fewer veggies. I bet you could use a bag of cruciferous crunch salad with this recipe.

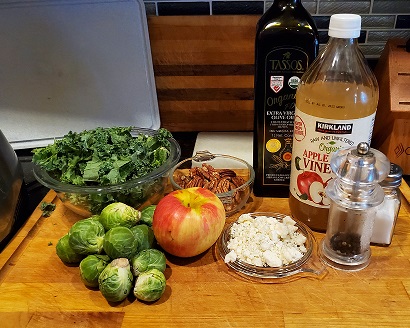
This recipe uses sliced Brussels sprouts and chopped kale. You can buy both of these things at the grocery store but it’s easy enough to do at home. I had fresh Brussels sprouts in my refrigerator so I sliced off the ends and then used my food processor with the slicing blade. I quickly had sliced Brussels sprouts at less than the cost of already sliced ones from the store.

You can also chop your own kale or buy pre-chopped at the store. I happened to have a bag of pre-chopped kale so it was convenient.

I used a honey crisp apple because that’s what was in my refrigerator. The honey crisp apple tasted great but you could switch the apple to something a bit more tart, if you prefer.

Ingredients for Brussels Sprouts and Kale Salad

2 cups of Brussels Sprouts, sliced

2 cups chopped kale

1 diced apple (remove skin if you prefer)

1/2 cup chopped pecans

1/3 cup blue cheese crumbles

Dressing

8 Tbsp of Extra Virgin Olive Oil

2 Tbsp of Apple Cider Vinegar

1 Tsp of Dijon or Brown Mustard

Directions

Mix the sliced Brussels sprouts and kale in a large bowl.

Pour the dressing ingredients into a small jar and shake well and then pour the dressing over the Brussels sprouts and kale.

Stir well, coating the vegetables with the dressing.

Cover the vegetables and let sit for at least an hour. Longer would be better. The dressing helps soften the crunchy vegetables so you could actually let this sit for a day in the refrigerator.

When it’s close to time to serve, add the chopped apple, pecans, and blue cheese. Mix well and serve.

Notes for Brussels Sprouts and Kale Salad

The quantities of kale and Brussels sprouts can be adjusted based on what you have on hand. You could probably omit the kale completely if you want.

The first time I made this salad, we ate it right away. It hadn’t soften from the dressing so we decided this would be better if it sat for a while.

You could omit the blue cheese or replace it with feta cheese.

I used pecans but you could also use walnuts or maybe pumpkin seeds. Experiment with what’s in your pantry.

My daughter-in-law doesn’t like cranberries so I didn’t use them but I think dried cranberries would be an excellent addition to this salad. If you’re going to serve it over the holidays, definitely consider using them just for that splash of color.

Brussels Sprouts and Kale Salad

Cabbage, Potato, and Sausage Soup in the Instant Pot

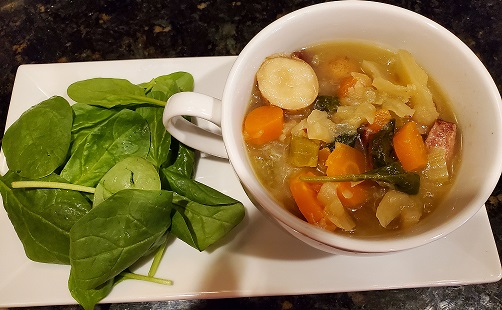
It’s fall once again and my heart turns to soups, including my recipe for a Cabbage, Potato, and Sausage Soup and I’m using the Instant Pot for this.

If you don’t have an Instant Pot, you can make this just as easily on the stove. I wanted to see how the cabbage and potato would work in the Instant Pot and it turned out great.

In all of the recipes in Becoming Elli, you can count on there being a lot of recipes that include cabbage. I’m not sure why that is. I posted my basic cabbage soup recipe a while ago.

Cabbage, Potato, and Sausage soup

Ingredients

1/2 Tbsp. avocado oil
2 carrots, chopped
2 stalks of celery, chopped
About 1 lb of baby red potatoes, cut in half or quarters depending on the size
1/2 of large onion, diced
1 or 2 cloves of minced garlic
About 1/2 head of cabbage, chopped into small pieces
1 package of turkey kielbasa (13 Oz), sliced
2 cups of baby spinach
4 cups of chicken broth
2 cups of water
Salt and pepper to taste
1/4 teaspoon crushed red pepper, optional

Instructions

Turn the Instant Pot on to Sauté. Add the oil and let it heat.

Add the carrots, celery, and onion to the pot and stir frequently for about 5 or 6 minutes.


Stir in the sliced kielbasa and sauté for a few more minutes.

Add the minced garlic and sauté for a minute or two longer.

Turn sauté off.

Add broth, cabbage, and potatoes to the Instant Pot.

Stir in salt, pepper, and crushed red pepper.

Set your Instant Pot to Soup, make sure the steam vent is set to pressurized and cook for about 30 minutes.

I usually let the steam release naturally but that’s not necessary if you’re in a hurry. When you’re ready, remove the lid.

Add the spinach and stir until it’s wilted.

Notes:

I used turkey kielbasa because that’s what I had on hand. I think chicken sausage would be great in this, as would traditional pork kielbasa. Really, any sausage will do. Use a vegan sausage if you are avoiding meat. I think you’ll want something in the sausage family for this soup. Otherwise, it’s just not cabbage, potato, and sausage soup.

You can add other vegetables to this. I think green beans would be a good addition.

I added the spinach at the end because it adds a lovely bright green color to the soup but you wouldn’t need to. If you want to add kale or a different green, remember that most cook longer than spinach so you would probably want to add the greens into the pot to cook with the other vegetables.

I used baby red potatoes but you can use any potato you want. Also, I always leave the skin on when I add potatoes to soup but that’s optional. I think even sweet potatoes would be good though it would change the flavor a bit.


Fiber and Flavor in My Favorite Salad

Regular readers know how much I love this salad. Perhaps you have developed a favorite go-to salad much like my perfect no panic potluck salad.

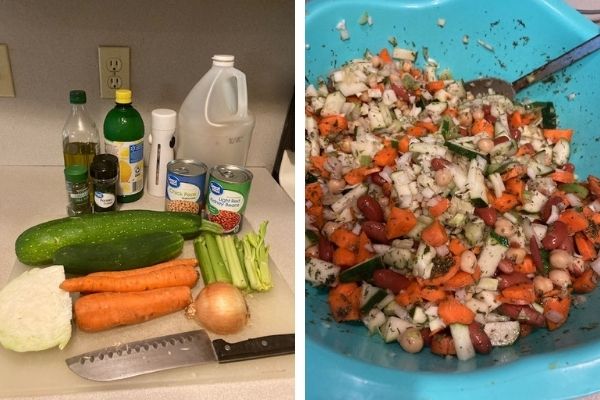
One reason I love this salad it that it doesn’t spoil quickly because the dressing is olive oil, vinegar and lemon juice. Another reason is that you can easily up the protein by adding beans and tuna. I usually add dill and basil to the dressing and toss. It’s great if you make it the day ahead because the flavor gets into all the veggies and really tastes great.

Of course the taste is something I really love. This time of year adding fresh veggies right out of the garden makes it especially appealing. Cucumbers, tomatoes, and fresh squash or zucchini are such delights.

The big a$$ salad by Pam Sherman is another favorite of mine, but when I don’t have time, I’ll use Heather Lentz’s trick of 3 cups of cut up peppers, carrots and celery for a snack.

What’s your fiber and flavor favorite?

Tuna and Sardine Salad

I never really thought I’d be writing a post about tuna and sardine salad.

The mind is a funny thing. I wanted to make lunch the other day and I thought I’d make my standard salad for lunch. I like to add protein to my salad. Usually I have some cooked chicken in the refrigerator just ready to be chopped up and added to my salad. This day, however, I was out of chicken because I used all of it in my Easy Coconut Red Curry Chicken. I was back to rummaging around in my pantry where I found a can of tuna and thought, no, that’s not what I want. A can of sardines was lurking behind the tuna. I remembered that I should definitely try to eat more sardines but didn’t really feel like making my standard sardine salad.

I wondered, “what if I mix a can of tuna with a can of sardines?” What could I do with that? I thought of adding some mayonnaise and some mustard. Wait a minute, I basically just thought of making regular old tuna salad and adding a can of sardines to it. What a radical thought! Later, I googled tuna and sardines and it turns out I’m not the first person to think of it but I guess that just proves it was a good idea.

Here’s the basic recipe that I came up with. Of course you could add whatever else you think would be good. Probably some onion would be a nice addition. I didn’t have any. How does that happen? I always have onion in the house but my trips to the grocery store don’t happen as often as they could, I guess.

Tuna and Sardine Salad

This was really good. Combining the two fish worked out really well. The two flavors definitely complemented each other.

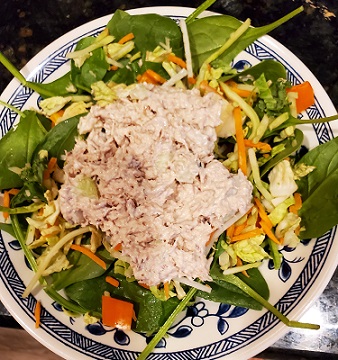
tuna and sardine salad

Ingredients for Tuna Sardine Salad

1 can each of tuna and sardines

1 stalk of celery diced finely

1/2 cup of mayonnaise (start with less and add until it’s the level of creaminess you prefer.)

Juice of half a lemon

1 tablespoon of Dijon mustard or whatever mustard you have on hand.

Directions for Tuna Sardine Salad

Drain the cans of fish and then mixed them in a mixing bowl. Break the tuna apart and mash the sardines.

Stir in the celery.

Add the mayonnaise, lemon juice, and mustard. Mix well.

Serve immediately or refrigerate.

tuna and sardine salad

Notes:

I ate the tuna and sardine salad on top of a bed of greens. It would also be good as a sandwich or as a dip for crackers. I bet you could make an awesome tuna (and sardine!) melt too.

I used regular mayonnaise but if you follow a particular way of eating, any kind of mayo will do. Vegan mayo or mayo made with avocado oil would be fine.

Add in other crunchy vegetables if you have them.

This was a delicious way to eat both tuna and sardines.

« Older posts Newer posts »

© 2026

Theme by Anders NorenUp ↑