Category: Recipes (Page 4 of 8)

Easy Coconut Red Curry Chicken

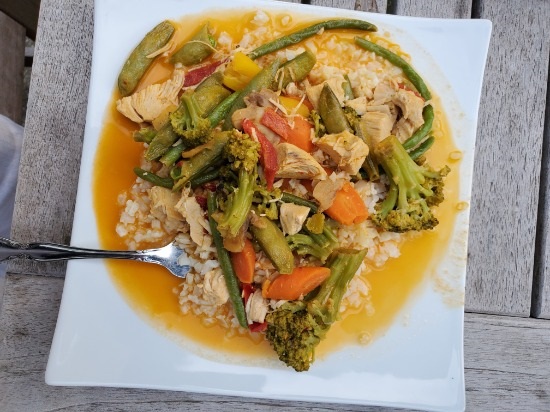
Here’s how I made an easy coconut red curry chicken. I used the ingredients I had on hand and came up with a tasty dinner that didn’t take long to assemble. Fast, easy, and good. It really doesn’t get much better than that.

I cleaned out my freezer recently and realized that I had a large bag of frozen stir fry vegetables that I needed to use sooner than later. Also, I had some cooked chicken breast that I wanted to use for my dinner. Not only did I have a can of coconut milk but I also had some red curry paste in the pantry.

Probably my dish is not very authentic Thai food but it was tasty and quick so it counts as a win for me.

I also used cauliflower rice instead of rice. It’s an easy way to add some additional veggies to your meal. If you’re wondering how to cook cauliflower rice, check out our fried riced cauliflower recipe.

Easy Coconut Red Curry Chicken

This is a one-pot meal that you can make quickly. It’s great for using up leftovers and for a weeknight dinner.

Ingredients

One can of coconut milk unsweetened

1/2 cup chicken bone broth or stock

One teaspoon tamari sauce (soy sauce would work as well)

Juice of half a lemon

2 tablespoons red curry paste

About three cups of Frozen stir-fry vegetables

One or two cooked chicken breasts diced

Cauliflower rice

Directions

In a large frying pan, add the full can of coconut milk, the tamari sauce, lemon juice, and red curry paste. Stir and heat until everything is blended and smooth.

Add the frozen vegetables and cook for about 7 to 9 minutes, until vegetables are tender.

Add the chicken and stir.

Cook a few more minutes to heat the chicken.

While the vegetables are cooking, heat your cauliflower rice.

Serve immediately over the cauliflower rice.

Easy Coconut Red Curry Chicken

Notes:

This is obviously a pretty versatile recipe. If you don’t have stir fry vegetables, just use whatever vegetables you have on hand. This would be a good way to use up those partially used frozen bags of veggies in the freezer.

You could also use chicken thighs instead of the breasts. Whatever you have on hand will be fine.

I chose to use cauliflower rice but you could use jasmine rice or brown rice. Whatever you have on hand is fine. I think this would be great over some rice noodles.

Let me know if you make this and how it turned out.


Cooking Cabbage in the Instant Pot

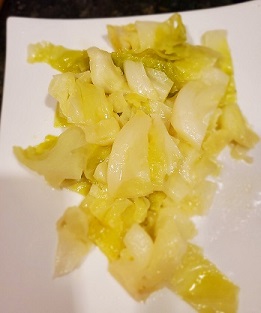
Cooking cabbage in the Instant Pot is so quick and easy. This recipe is perfect for nights when you need some vegetables quickly. One of the things I like about the Instant Pot is that you can cook things quickly and easily. You load it up and turn it on and only deal with it again when the Instant Pot turns off.

I just have to share this recipe even though it’s another cabbage recipe. We provide a lot of ways to cook cabbage here at the Becoming Elli website. We’ve posted recipes for cabbage soup, keto cabbage, spicy cabbage in the crockpot, and others. Just go to the website and do a search on cabbage. You’ll see what I mean.

You only need three items for this recipe: cabbage, broth, and butter. That’s it. I used chicken bone both but you could use vegetable broth or even water. Beef broth might work too but I’ve never used it.

You can also add some salt and pepper to this dish if you like.

I used Kerrygold butter but regular butter will work well too. I just love my Kerrygold.

Cooking Cabbage in the Instant Pot

Cooking Cabbage in the Instant Pot

Ingredients

1 cup chicken or vegetable broth or water

4 tablespoons butter

1/2 head of cabbage, roughly chopped

Directions

Put broth and butter in the bottom of the Instant Pot.

Place cabbage into the pot.

Put the lid on the pot.

Pressure cook for 6 minutes. You can let the pressure release naturally for a few minutes and then manually release the pressure.

Notes

You can add carrots or potatoes to this. If you add potatoes, increase the cooking time to 9 minutes. The size of the potato will affect the cooking time.

cabbage in Instant Pot

I think you’ll enjoy this recipe. If you try it, let me know what you think. You can email me at jill@becomingelli.com or just leave a message below or on our Facebook page.

Pam Sherman’s Big Ass Salad

Are you wondering about the Big Ass Salad?

During our recent podcast interview with Pam Sherman, she mentioned that she has a salad every day.

Not just any salad, but one she refers to as the BAS! The Big Ass Salad. She says the cabbage is more filling than a spring mix.

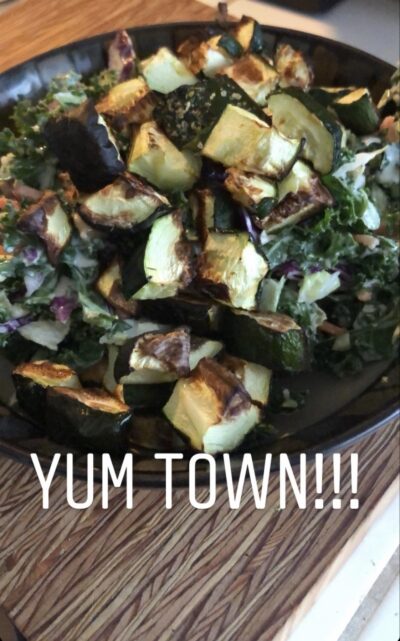
Jill and I just couldn’t let that go! We needed the recipe… and photos!
Thank you Pam for this delicious inspiration!!

Here’s the recipe for my favorite BAS
Pam Sherman's Big Ass Salad

Spinach – I cut this up as I hate big lettuce leaves
Green cabbage – finely chopped
Fruit – in the winter I use apples or pears, summer, any berry is fantastic
Nut – we love almonds and pistachios but any nut works great
Cheese – crumbled goat is our go to!
Balsamic onions – cook onion until soft(either red/yellow work), add balsamic vinegar and cook down until vinegar is absorbed into the onion.

I do take kitchen scissors and chop up everything finely- it makes it so much easier to eat!

For my Big Ass Salad dressing I use..

1 cup cashew/almond milk
1 Tbl honey mustard
1/2-1 Tbl chopped garlic
few shakes of coconut aminos- worchestershire works as well
1/3 cup while balsamic or red balsamic
1-2 Tbl of hummus to make it creamy!

Mix all in magic bullet or blender.

Enjoy!!

Cabbage Soup is Lunch of Choice

I am having cabbage soup for lunch today. I made a large batch of soup a few weeks ago and put some containers of it in the freezer to save for later. Today is a cold, snowy day here in Ohio and I’m working from home. I was daydreaming about what I was going to eat for lunch and decided to get a container of soup out of the freezer.

Customizing the Soup

The best thing about this soup is that I can add to it. When I made this soup originally, I added some cooked chicken and beans to the soup.

Today I decided to use up the chopped butternut squash that was in my refrigerator so I chopped it into smaller pieces, coated it with some avocado oil, and roasted it. I intend to add the butternut squash to my soup. I also have spinach in the refrigerator. It doesn’t take long to cook spinach so I’ll heat up the soup, add the squash, and add a handful of the spinach. That makes a great bowl of soup. If I wanted to add protein, some beans or shredded chicken might be a nice addition.

I make the big pot of soup without adding much in the way to seasoning. I’ll add some salt and pepper maybe. When I’m doctoring up the soup for a meal, I can add more seasoning to the smaller bowl. Some ideas on that might be some Italian seasonings or just some oregano with the salt and pepper. Sometimes I add some cayenne pepper to spice it up a bit. I think you could add some taco seasoning to the soup as well. Whatever strikes your fancy will work.

I’ll have some Mary’s Gone Crackers and goat cheese as a side dish. If you read this blog often, you know that I love those crackers.

I just noticed that we have many recipes for cabbage on the Becoming Elli website and recipes for soup but we don’t have a recipe for cabbage soup. The closest thing is Chris’ recipe for vegetable soup. So, let me give you my recipe.

You’ll want to know that you can swap vegetables in or out of this soup. Use what you have on hand.

Recipe for Basic Cabbage Soup

Ingredients

1 Tbs oil (I use avocado oil)

1 onion, diced

3 carrots, sliced

2 celery stalks, chopped

1½ cups green beans, chopped into 1 inch pieces

1 can diced tomatoes

½ head of cabbage, chopped into small pieces

8 cups chicken broth or vegetable broth

Directions

In a large Dutch oven or soup pot, heat the oil and then saute the onion in it until the onion begins to soften.

Add the carrots, celery, green beans, tomatoes, and cabbage.

Pour in the chicken broth.

Simmer for 10 to 15 minutes until cabbage is tender.

Notes

When you’re ready to eat the soup, add whatever ingredients you want.

Suggestions could be pasta or noodles, cooked chicken, chopped sausage, canned beans, greens, cooked potato. Use what you have on hand.

If you add white beans, kale, and some Italian spices, top your bowl of soup with some Parmesan cheese.

If you add chicken and cumin, top the soup with tortilla strips or some cheddar cheese.

Consider your soup to be the base for whatever you want.

Making Homemade Hummus

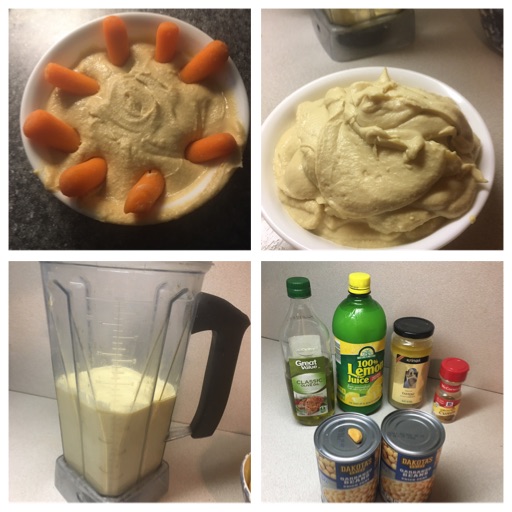
Last night I made homemade hummus and it was delicious. My only complaint with this recipe is that it makes so much! I got the recipe from my VitaMix cookbook but I modified it a little.

Ingredients:
Chickpeas (aka Garbonzo beans) two 15 ounce cans (one drained, one with liquid)
Olive Oil – 1 and 1/4 Tablespoons
Lemon Juice – 1/4 Cup of lemon juice
Tahini (or sesame seeds) – 2 Tablespoons of Tahini or 1/4 Cup of sesame seeds
Cumin – 1 teaspoon
Garlic – one clove peeled and mashed

Put it all in a blender. Turn on the power. I used the frozen dessert setting for about 2 minutes. It gets whipped into a very creamy texture. So delicious!

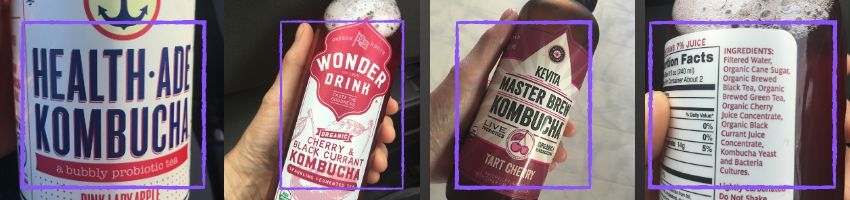
Health Benefits of Kombucha

Have you ever tried Kombucha? Jill introduced me to this type of fermented tea. One day when I went to her place for recording an intro for a podcast she asked me if I’d like one.

Honestly I had never tried it before and had a very vague idea of what it is. I’ve heard it has a “mother”, which sounds like making yogurt to me. And I’d also heard about Scoby, but I had no idea about it. (SCOBY is actually an acronym: Symbiotic Culture Of Bacteria and Yeast.) Sounds delicious, right?

The flavor is tart and oddly yummy.

I found that I really love it on a hot day or when I’ve been exercising and am thirsty. It really quenches my thirst like most drinks don’t. Most people are interested in it because of the health benefits of kombucha. I’ve heard it is good for hangovers, but I have no experience with this. I’ve seen claims of antioxidants, good for fighting different diseases, and Kombucha, like many fermented foods, is supposed to be good for the gut. I do know that kombucha does agree with my gut.

Kombucha originates from China and it is fermented tea made from a starter culture. Since I first had it, I’ve tried several types and look for it at the store. It’s somewhat expensive at about $2.50 to $4 a bottle, and you can’t find it everywhere, so I’ve considered making my own. My friend Kathy has made a fermented drink that I think she said was scoby and she said it was easy to make (but she’s pretty clever) and I’m still trying to get up the nerve to make some myself.

Some of the kombucha drinks I have found in the grocery stores seem to have very high levels of sugar, so that’s not so healthy. (One I tried had 14 grams of sugar, about the same as a medium banana. No wonder it tasted good. The American Heart Association says women should only have 25 grams per day.)

As far as the health benefits of kombucha, when I checked some of the sources online, I haven’t been able to find any studies that have actually convinced me. NIH and CDC have more warnings about it than suggesting you use it.

In fact, I found warnings about the health of drinking kombucha and several antidotes. I guess its not all about the health benefits of kombucha, there are negatives as well – for example WebMD says, “Kombucha can cause side effects when contaminated including stomach problems, yeast infections, allergic reactions, yellow skin (jaundice), nausea, vomiting, head and neck pain, and death.” Death, yikes! I have canned my own spaghetti sauce and know that having sterilized containers to start is critical. I think that the trick is don’t drink contaminated Kombucha!

Have you ever used a kombucha recipe? If so, leave a link below. How did it go?

Depending on the size of the batch, the recipes I looked at online take around 4-6 weeks to ferment, so if I do make some this next week, should be ready for drinking around Valentines’ Day!

Butternut Squash – Veggie Challenge

There is something so delicious about butternut squash! I thought I’d share my simple way of preparing them.

Turn on the oven to 400 to preheat it.

Prepare the butternut squash:

I find that the skin peel is super hard on butternut squash. So the first thing I do is pierce the skin with three skewer holes and microwave for 2 minutes.

Put olive oil on a cookie sheet. Sometimes I put tinfoil down on the sheet first and then the olive oil. It’s up to you.

While this short microwave doesn’t really cook the squash, it softens up the thick skin enough that I can get a knife into them. I split them down the middle. Place face down on a lightly oiled cookie sheet to prevent sticking. I use olive oil.

Place the butternut squash face down. I usually leave the seeds in place for now. Set the timer for 40 minutes.

When the timer goes off, press a fork into them to see if they are super soft. Mine were just soft, so I cooked them for another 20 minutes, face down.

I flipped them over and removed the seeds. Now it is easy to peel the skin off of them.

Making something from the baked butternut squash:

If you’ve only cooked them until they are soft, it’s easier to cut pieces into chunks. Maybe remove some of the squash from the tray so they are just soft, not super soft, especially if you are using them in a recipe that is not soup.

By cooking the additional 20 minutes, these were fully roasted, very scoop-able and perfect for creating a soup.

I’m planning to make soup from the squash by putting it in my blender with some pumpkin spice seasoning, a little vanilla flavoring and some almond milk. But for now, I think I’ll have one just plain. Delicious.

This doesn’t really count for the #VeggieChallenge because I’ve made these many times since 2007. Up to that point I’d never buy these because I had no idea what to do with them. Now butternut squash is a food staple for me in the months of October and November.

How do you use butternut squash? Do you add it to salads, combine with other squashes or mash it like potatoes? Let me know by leaving a message below.

Happy Halloween and enjoy!

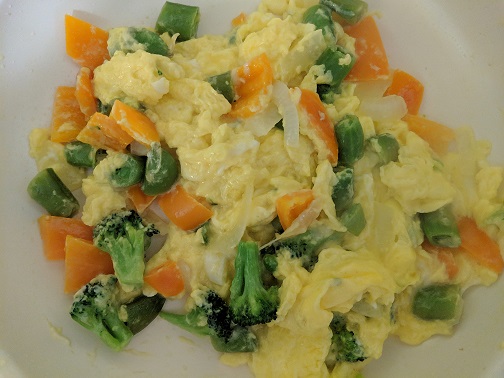
Scrambled Eggs with Vegetables Recipe for Veggie Challenge

Scrambled eggs with vegetables is just about the easiest breakfast imaginable. The only thing easier would be omitting the vegetables and just having scrambled eggs but then that wouldn’t work for the veggie challenge, would it?

I often order a vegetable omelet when I breakfast at a restaurant but I struggle to make omelets as good. This dish is similar but easier. There’s something about starting with day with this dish that just makes me feel like I’m off to a good start.

Scrambled Eggs with Vegetables

Assemble the vegetables that you have on hand and chop them into small pieces. Try to make them as close to the same size as possible. In this photo, I used onion, bell pepper, broccoli, and sugar snap peas.

scrambled eggs with vegetables

Break two or three eggs into a bowl and whisk until the yolks and whites are blended.

Melt some butter or oil in a small frying pan over medium heat.

Add the vegetables and saute until tender.

Add the whisked eggs and gently fold the eggs as they cook. When the eggs are done to your liking, transfer to a plate.

Salt and pepper to taste.

Enoy your breakfast of scrambled eggs with vegetables.

Notes

If you eat dairy, cheese is a great addition to this dish. You can use cheddar, swiss, or pepper jack cheese. Again, whatever you have on hand is fine.

Greens would be a good addition to this dish. If you have kale or spinach or some other type of greens, consider adding some to the vegetables. Spinach cooks more quickly than most vegetables so you should add it after the other vegetables have started to become tender.

You can also top this dish with some salsa if you have it. That’s an easy way to add even more vegetables to the dish.


Breakfast Smoothie Recipe Veggie Challenge

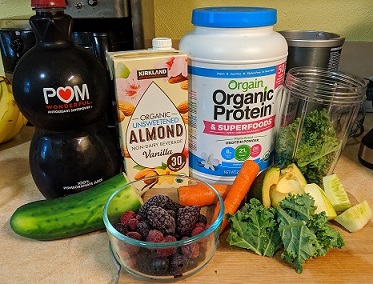
I’ve been making a breakfast smoothie frequently for the past few months. I seem to go in cycles on smoothies. At times, they’re great and I enjoy having them. They satisfy me until lunch time and I have control over what I eat.

Because I add the frozen berries and the pomegranate juice, this smoothie is not green. It can turn a pinkish color, though sometimes it’s not an appetizing color. If that happens, serve it in a mug.

Here’s the recipe of what I’ve been doing lately. You can easily switch out the vegetables and fruit. Just use what you have on hand.

Breakfast Smoothie Ingredients

2 handfuls kale

1 chunk cucumber, skin  removed unless organic

1 carrot

1/2 avocado, peeled and seeded

2 to 3 handfuls frozen berries

1/4 cup pomegranate juice

1 cup almond milk

1 serving Orgain Organic Protein Powder, Vanilla Bean flavor

Throw all of the ingredients into a strong blender and blend. Follow your blender’s directions for the best order to put the ingredients.

This makes one generous serving or two moderate servings.

Notes

  • You can use whatever vegetables you have on hand though be careful if you use a vegetable with a strong flavor. For example, I find the taste of celery to be too distinctive to use in a smoothie.
  • If you don’t have any avocado, use some other source of fat. That might be a tablespoon of coconut oil or almond butter. Having the fat in the smoothie helps this feel like a complete meal.
  • You don’t have to use any juice in this. Besides the pomegranate juice, I love adding cranberry to the smoothie. I buy Just Cranberry. It’s made solely of cranberries. No other juices or sweeteners. It’s quite tart.
  • Adding some green or herbal tea, preferably room temperature or chilled, works well as a liquid.
  • I don’t add banana to this because the vanilla protein powder makes this sweet enough. If I wasn’t using the powder, I’d consider adding a banana for sweetness.
  • The frozen berries work well in the smoothie because they keep the drink cold. Of course, you can use fresh berries. Also, sometimes I use only blueberries or raspberries or strawberries. What you have on hand is the best choice.

breakfast smoothie


Kohlrabi Slaw — Veggie Challenge

Today’s recipe as part of the Becoming Elli Veggie Challenge is Kohlrabi Slaw. This is not only a new recipe for me, but also a new vegetable.

I went to a local farmer’s market recently and bought an assortment of things to try. My friend who went with me said, “well, you’re certainly an inspirational shopper.” I’m looking forward to trying the six-pack of kombucha I bought. I hope it’s good because it was expensive. At least I thought it was.

The Becoming Elli community has been doing the veggie challenge this year: eat a new vegetable or prepare a tried-and-true vegetable in a new way. So, while I was at the farmer’s market, I decided to buy some kohlrabi, which is a brand new vegetable for me.

One of the members of the Becoming Elli Facebook Group (join us, if you haven’t already!) said that kohlrabi is one of her favorite vegetables and she likes it raw. OK, so that got me curious.

A bit of online sleuthing and I decided to make a kohlrabi slaw.

Kohlrabi, also called German turnip, is in the same family as cabbage, Brussels sprouts, cauliflower, and broccoli. It looks like a root vegetable but it’s actually not. It’s really a stem. The greens are also edible. I’ll cook them and report back on that.

I thought the texture of kohlrabi was similar to jicama, which Chris discussed a while ago. I suspect you could swap the two in a recipe.

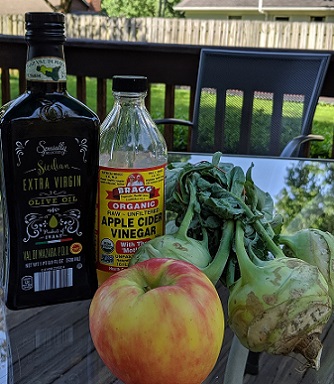
Kohlrabi Slaw Ingredients

1 kohlrabi bulb, cut into matchsticks

1 apple cut into matchsticks

Olive oil

Apple Cider Vinegar

Salt and Pepper

Directions

Cut the kohlrabi and apple into matchsticks.

kohlrabi slaw

Mix the matchsticks in a bowl with some olive oil and apple cider vinegar. Use about a tablespoon of each, mix, and decide if you need any more.

Season with salt and pepper.

Refrigerate for at least an hour before serving.

kohlrabi slaw

Notes

I used honey crisp apples. The sweetness worked well with the vinegar and the kohlrabi. Certainly, try other apple types to see what works best for you.

I really liked this slaw. The apple provides a bit more sweetness than the kohlrabi and the kohlrabi provides a bit more crunch than the apple. The olive oil and apple cider vinegar add a bit of zing to the dish.

kohlrabi slaw

« Older posts Newer posts »

© 2026

Theme by Anders NorenUp ↑