Fit Strong Women Over 50.

Category: Recipes (Page 1 of 8)

Beyond the Basic Bowl: Creative Ways to Use Quinoa

So you’ve jumped on the quinoa bandwagon (welcome to the club!), but you’re getting tired of the same old quinoa-and-vegetables routine. I get it. Even superfoods can get boring when you’re eating them the exact same way every single day. The good news? Quinoa is way more versatile than most people realize. There are some creative ways to use quinoa in your cooking. Chris and I have written about quinoa before and came up with some good ideas but you can always use more.

Quinoa is a good source of vegetarian protein so it’s worth trying to figure out ways to use it creatively.

First up, let’s talk breakfast. Quinoa porridge is a game-changer for anyone looking to switch up their morning routine. Cook quinoa in milk (dairy or plant-based), add some cinnamon, vanilla, and a drizzle of maple syrup. Top it with fresh berries and nuts, and you’ve got yourself a protein-packed breakfast that’ll keep you full until lunch. You can even make it the night before and heat it up in the morning.

Feeling fancy? Try quinoa pancakes. Just blend cooked quinoa with eggs, a banana, and a splash of milk. The result is fluffy, protein-rich pancakes that don’t require any flour. They’re naturally gluten-free too, which is a nice bonus.

For lunch and dinner, think beyond the bowl. Quinoa makes an excellent stuffing for bell peppers, zucchini, or tomatoes. Mix it with herbs, diced vegetables, and maybe some cheese, stuff it into your veggie of choice, and bake. It’s like comfort food that happens to be incredibly nutritious.

Quinoa salads are where things get really interesting. Unlike lettuce-based salads, quinoa salads actually get better as they sit, making them perfect for meal prep. Try a Mediterranean version with cucumber, tomatoes, olives, and feta. Or go Mexican with black beans, corn, avocado, and lime dressing.

Here’s something most people don’t think of: quinoa burgers. Mash cooked quinoa with some beans, add an egg to bind everything together, season it up, and form into patties. They hold together surprisingly well and have this great nutty flavor.

You can even use quinoa in desserts. Quinoa chocolate bark with nuts and dried fruit is surprisingly addictive. Or try quinoa energy balls mixed with dates, nut butter, and cocoa powder.

The key with quinoa is seasoning. On its own, it’s pretty neutral, but that means it plays well with whatever flavors you want to throw at it. Whether you’re going for Mediterranean, Asian, Mexican, or just plain comfort food vibes, quinoa is happy to go along for the ride.

There are plenty of creative ways to use quinoa so stop thinking of it as just a rice substitute and start seeing quinoa as the culinary chameleon it really is.

Buddha Bowl

What is a Buddha Bowl? It usually includes a combination of both cooked and raw vegetables, whole grains, a source of protein and a sauce. Buddha Bowls were originally a vegan dish but if you’re not a purist, you can add some animal protein. I usually end up with chicken or some shrimp on mine.

The beauty of Buddha bowls lies in their flexibility—you can tailor them to fit your taste preferences, dietary needs, and what you have on hand. Whether you’re aiming for plant-based, low-carb, or just looking to increase your vegetable intake, there’s a Buddha bowl for you.

To build your own, start with a base like quinoa, brown rice, or leafy greens. Add colorful vegetables like roasted sweet potatoes, bell peppers, carrots, or cucumbers for a burst of flavor and nutrients. Next, include a protein source. For a plant-based option, try chickpeas, black beans, or tofu. If you prefer animal-based protein, grilled chicken or shrimp works well too. Finish it off with healthy fats like avocado, nuts, or seeds, and a drizzle of sauce—think tahini, hummus, or a light vinaigrette.

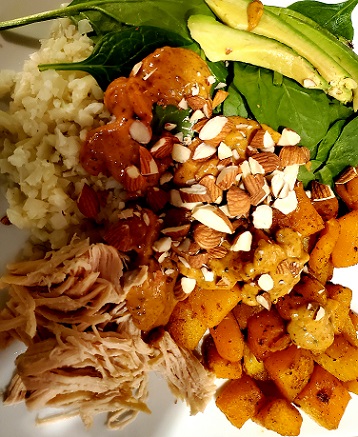
I have made Buddha bowls with a variety of ingredients. It comes down to what I have on hand. For one meal, I used cauliflower rice with roasted butternut squash and spinach. I added some shredded chicken breast and sliced avocado. I topped it with a sauce I had made and then sprinkled some chopped peanuts over it.

For another meal, I used some cooked quinoa, roasted sweet potato, raw spinach, chickpeas, a spicy almond butter sauce, and a sprinkling of roasted squash seeds.

One of the greatest things about Buddha bowls is that they make healthy eating feel satisfying and fun. They’re perfect for meal prep too. You can chop your veggies, cook your grains, and have everything ready in advance, making weekday lunches or dinners a breeze. Plus, there’s something so fulfilling about seeing a bowl full of nourishing, real food that’s ready to fuel you through your day.

If you’re looking for a fresh way to shake up your meals, give Buddha bowls a try. They just might become your new go-to!


Vegetable Soup for a Cold Weekend

Vegetable soup for a cold weekend seems like a natural for me.

It’s been very cold here in Northeast Ohio this weekend. So making various soups has been my go to response for eating. Here are some snapshots and recipes.

Super Quick Salsa Soup

Ingredients:

1 jar of mild or medium salsa
1/2 teaspoon garlic powder
1/2 teaspoon cilantro
2 cans black beans (rinse)
1 bag of frozen vegetables (thawed)
1 can corn undrained
3 cups chicken broth
2 cups shredded cooked chicken

Instructions:

  • Dump everything into a pot.
  • Bring just to a boil.
  • Reduce heat and simmer for about 10 minutes.

Top with shredded cheese, if you like. This is an easy way to get lots of vegetables and especially good if you have “put up” a lot of homemade salsa in the fall. The beans and chicken add protein and the heat in the salsa is enough of a kick for me.

Salsa Soup - Vegetable Soup for a Cold Weekend

Salsa Soup – Vegetable Soup for a Cold Weekend

I have been trying to get a variety of color in my meals by following the Eat The Rainbow challenge. Here is another soup that I ate but the colors are not rich and beautiful

Vegetable Soup with Chicken

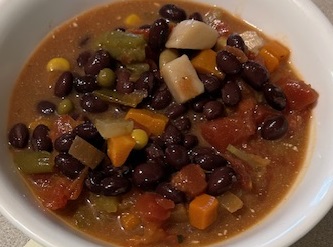
Last weekend I made a vegetable soup with chicken and added a can of kidney beans and black beans. My big mistake was not rinsing the black beans enough.

Vegetable soup with chicken breast  - Vegetable Soup for a Cold Weekend

Vegetable soup with chicken breast – Don’t forget to drain the black beans!

Without rinsing the beans, the broth and chicken, actually all the vegetables too, took on the hue of black beans. It all looked a little suspect and not very appealing.

It still tasted delicious.

Vegetable Soup with Shrimp – No broth

Shrimp and vegetables were also a great way to get a variety of color in my meal. I didn’t actually have a broth going so I shouldn’t call this soup… but it was really delicious too.

I got an air fryer for Christmas from my husband and I’ve been trying different food and meals in it. While the shrimp was cooking in air fryer, I defrosted the vegetables and did a quick stir fry to saute them.  So far, I really like cooking the shrimp on it. I missed having the broth, because that is one way I sneak extra water in my system without actually drinking water. I find it hard to drink enough water in the winter when it is cold, so drinking it as a broth really helps!

Shrimp cooked in the air fryer over vegetables. Soup without the broth!

What’s your favorite vegetable soup recipe? Please share it here in the comments or on any of our social media pages using Becoming Elli as the handle.

Lunch of Veggies with Protein

I had an awesome lunch over the weekend of veggies with protein. It was delicious. It seems like all the vegetables are becoming ripe and are really tasting especially good to me right now. Maybe it is just that time of year!

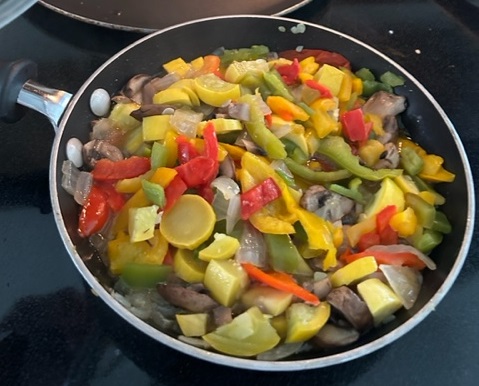
By this photo you might think I didn’t get enough protein ,but I added a couple of ingredients at the end of cooking and after I took this photo that really boosted the protein levels in my meal.

Here’s my recipe for these delicious veggies. No surprise, I sautéed them on the stove.

To prepare this meal, first I pulled out the cutting board and a sharp knife. Heated up the pan with some extra virgin olive oil.

Chopped and sliced the following veggies:

  • Onions
  • Peppers: red, orange, yellow, (forgot to get green peppers)
  • Yellow Squash
  • Celery
  • Mushrooms

The onions went into the heated olive oil first because it took them the longest to cook. I sautéd all the vegetables over medium heat and after it started really cooking, I added a little bit of water, then covered it and turned down the heat to low.

I put the mushrooms in very last because they so cook much faster.

Adding Protein
In order to get more protein I added some tofu and some feta cheese. Tofu has a lot of protein (9 grams of protein in a 3 oz piece.) And the feta cheese added some great flavor. I added a little salt and pepper to taste. This meal was really delicious. Tons of colorful vegetables, so I am “eating the rainbow” and getting lots of veggies. #veggiechallenge2032

These vegetables are are fairly typical, probably the only unusual ingredient was the tofu, which I don’t usually have on my shopping list.

Tofu takes on the flavor of the other foods and it didn’t take much for it to take on the flavor of the vegetables in olive oil. So if you’ve thought about trying tofu in your meals, this might be a good way to try it. I usually slit the top and drain it. There’s a lot of water in the carton.

I cut it like a checkerboard into probably 25 pieces, at least 16 pieces. And when storing it in the refrigerator, I place it in a gallon zip lock sandwich size baggie. It’s got a consistency that is thicker than yogurt or pudding, but similar texture. It’s probably not something to eat plain, just by itself unless you really love it.

Do you like tofu? How do you prepare it or add it to recipes? I’d love to learn new ways of eating it as I think it’s a really good protein for me.

Eat and Flourish with Mary Beth Albright

Episode 127- Eat & Flourish with Mary Beth Albright

Download | Play in New Window
Please SubscribeApple Podcasts  (iTunes) Google Podcasts | Android-Google Play | Stitcher | Player FM Castbox | Tunein | Spotify | RSS | Amazon Podcasts

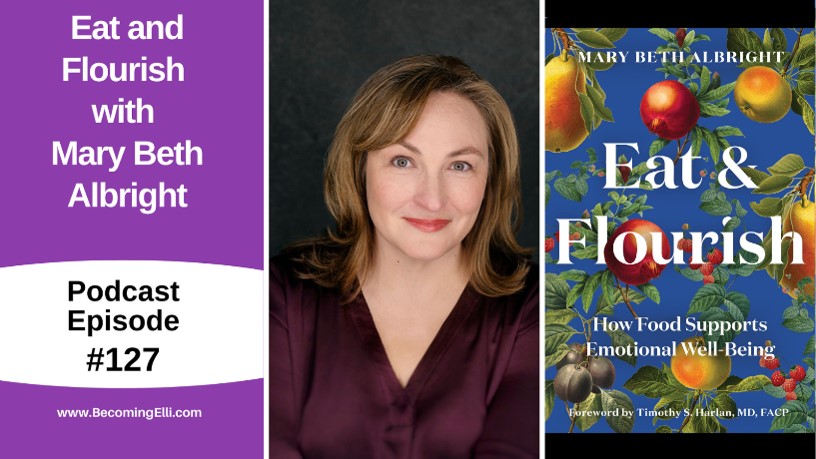
In episode 127, Jill and Chris talk with Mary Beth Albright, the author of Eat & Flourish, How Food Supports Emotional Well Being. She is a food expert with broad experience, from food attorney to being a finalist on Food Network Star, where she competed on Iron Chef America.

Her passion for good food grew from her mentor, Surgeon General C. Everett Koop who she worked with for 15 years. Afterwards, Mary Beth advised on food systems and managed a White House initiative. She completed L’Academie de Cuisine’s two-semester culinary course in Bethesda, MD.

Mary Beth is a writer and editor at the Washington Post. She is also a frequent panel moderator, including for the U.S. State Department and the Smithsonian, and her food-judging expertise is sought regularly, including the time she ate 2,000 foods in three days to judge the Outstanding New Products Awards. She is an elected member of Les Dames d’Escoffier, an esteemed group of women in the culinary professions, which counts Julia Child among its alumnae.

We discuss:

  • How food affects emotions
  • How emotions affects our food choices
  • Making better choices when you are under stress or feeling depressed
  • Pleasure and eating
  • Foods that support emotional well being
  • The American Gut Project
  • Tips to increase pleasure around eating
  • Why eating with others is good for you
  • How to easily add a more diverse variety of food into your meals
  • Recipes

Links:
Instagram: Mary.Beth
Twitter: MaryBeth
Website: MaryBethAlbright.com
Her book: Eat & Flourish, How Food Supports Emotional Well-Being

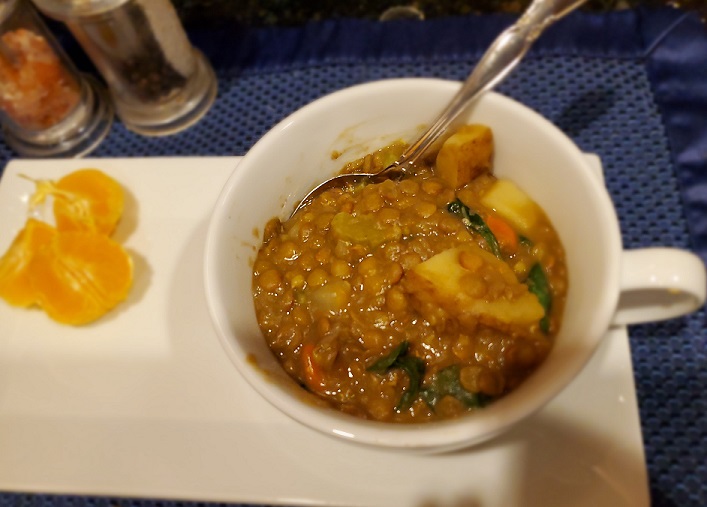
Instant Pot Lentil Soup with Potatoes and Spinach

I thought I’d share my recipe for lentil soup with potatoes and spinach made in the instant pot.

Chris shared with you a picture of her soup that she had when we went out for lunch. She always gets the v9 soup. I always get their lentil soup. I rarely make lentil soup but I really enjoy it.

So since it’s a cold wintry day today and I had the lentils in my pantry, I thought I need to make some soup.

This recipe is fast to make and is easy.

Ingredients

1 Tbsp olive oil
One onion diced
Two cloves garlic minced
1 carrot, diced
1 celery stalk diced
2 White potatoes, diced
1 16-oz package of green lentils
One bay leaf
Four cups of chicken stock
Two cups of water
2 to 3 large handfuls of fresh spinach
Salt and pepper to taste
1/8 tsp red pepper ( optional )
1/2 Tbsp apple cider vinegar

Directions

Turn on the saute function on the instant Pot.
Add olive oil and heat.
Saute the diced onions for about 5 minutes, until translucent and tender
Add minced garlic and saute for another 30 seconds.
Stir in celery and carrots. Saute for a few more minutes.
Add potatoes lentils, bay leaf, broth and water.
Stir.
Put the lid on the instant pot.
Using the manual option pressure cook on high for 7 minutes
Let the pressure release naturally.
Once the pressure has released, remove the lid, and stir in the spinach. Stir until the spinach has wilted.
Add the salt and pepper to taste. Add the cayenne pepper if you want.
Stir in apple cider vinegar.

Notes

Because there’s a lot of liquid in this, it will take the Instant Pot a while to build up pressure and then to release pressure.

If you want to make this vegan, substitute vegetable broth for the chicken broth. I just used what I had on hand.

This recipe is easy to adjust. Increase or decrease the vegetables as you want.

Potatoes can be whatever you have. I used white because they were in my pantry. Golden potatoes or red potatoes would be great too. Sweet potatoes might be an interesting variation.

I did not add much spice to this but you certainly could. This is a pretty mild soup so some herbs or spices might work well in it. I think some cumin and chili powder would work. Some curry powder would probably be tasty too.

Let me know if you try making this recipe and what you think.

Making Hard Boiled Eggs in the Instant Pot

My new favorite thing is making hard boiled eggs in the Instant Pot. I like hard boiled eggs because they’re good for a snack and can be added to a salad. I also make deviled eggs once in a while.

Why do I keep posting things about using my Instant Pot? I like using it because I can walk away from it and not have to worry about something boiling over on the stove or basically paying attention to what’s cooking. If you do a search on this website for Instant Pot, you’ll find a number of different recipes. We also discussed this on the Fit Strong Women over 50 Podcast, Episode 112 FAQ – Ask Us Anything with Chris and Jill 

It’s not hard to make hard boiled eggs on the stove but once again I think it’s just a bit easier using the Instant Pot. It’s not faster at all but still easier.

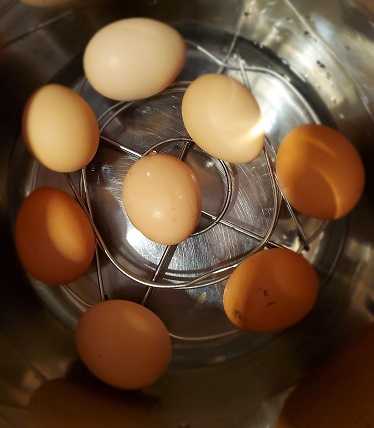
This is really easy. Put your eggs on the wire rack in the Instant Pot and then add a cup of water.

Hard Boiled Eggs in the Instant Pot

Put the lid on, being sure to move the knob to pressure. Using the Pressure Cook setting, set the Instant Pot for five minutes.

It will take about five minutes for the Instant Pot to come to full pressure and then five minutes to cook. You can then release the pressure after about five or ten minutes.

Put the eggs into a bowl of ice water to stop the cooking.

You then have perfectly cooked hard boiled eggs.

If you want soft boiled eggs or medium boiled eggs, just reduce the time. I would think 3 minutes for soft and 4 minutes for medium.

Let me know if you make hard boiled eggs in the Instant Pot or if you have any good ideas on things to do with the eggs no matter how you cook them. I’d love to hear your ideas.


Roasted Pumpkin Seeds in the Air Fryer

It’s that time of year again when we grab some pumpkins and carve them into jack o’lanterns. We had a little pumpkin carving party at my house recently. You can see the results of our handiwork in the photos above and below.

We carved four pumpkins and I took all of the seeds to roast.  I basically followed the recipe I posted a few years ago about roasting squash seeds but decided to try using the Air Fryer instead of the oven.

I will say that making roasted pumpkin seeds in the air fryer worked well. The seeds turned out well.

First, I washed the seeds to get the goopy pumpkin strings off of them and then I boiled them for a few minutes.

I then poured the seeds into a colander and then into a towel to dry them.

I put the seeds into a bowl and coated them with about a tablespoon of avocado oil and some sea salt. You can use whatever oil you want on the seeds. Some people coat the seeds in melted butter which probably gives them a richer flavor. I was worried that seeds cooked in butter wouldn’t last as long as ones cooked in oil so I stuck with the avocado oil.

I then cooked them in the air fryer for about 10 minutes at 375°, shaking them at about the halfway point.

The air fryer worked well. It was very easy and didn’t take long. I think roasting in the oven is a longer process. The only problem with the air fryer was that the seeds fell through the base into the bottom of the pot. They were fine, despite falling, but it seemed a bit odd. I guess since the seeds didn’t really cook on the base, I could have just covered it with some foil or parchment paper.

Because I cooked the seeds from four pumpkins, I had a lot of them. So, I ended up roasting the seeds in two batches.

Recipe for Roasted Pumpkin Seeds in the Air Fryer

Raw pumpkin seeds, as many as you have.

Oil (Olive oil, avocado oil, even melted butter. Use your preferred oil.)

Salt

Any other spices you want to use.

Wash the seeds in running water. You can let them soak for a while first to loosen the pumpkin strings and glop.

Bring a medium pot of water to a boil and add the seeds.

Simmer for about five minutes.

Drain the seeds and then dry them by wrapping in a clean dish towel or paper towels.

Put into a small bowl and mix with the oil, salt, and any spices you like.

Put into the air fryer and cook at 375.

Cook for about 10 minutes or until the seeds have reached a crunchy, roasted state.

Shake the seeds around about half way through the roasting.

That’s it! A batch of crunchy roasted pumpkin seeds, full of vitamins, fiber, and tasty goodness.

Roasted Pumpkin Seeds in the Air Fryer

Curry Popcorn Recipe

A friend made me this curry popcorn one year for my birthday. I thought it was the best snack food I’d had in a long time so I asked her for the recipe. She made a copy for me and I made it several times.

Then, as life happens, I moved and boxed everything up and didn’t unpack things as well as I packed. I was looking for this recipe and couldn’t find it. Recently I opened a box I’d stored in the closet in my office and there was the recipe for curry popcorn. I got the munchies just thinking about this popcorn.

The funny thing is that I wrote a lengthy list of healthy snacks in an earlier blog post but I didn’t mention popcorn at all. It must have been in one of my phases of avoiding grains.

This popcorn is no harder to make than regular popcorn. The advantage to it is that it’s got a lot of flavor so you don’t need to douse it in melted butter. Not that I don’t love buttered popcorn but it’s not the best snack for you.

This recipe calls for making the popcorn on the stove, which, of course, requires you to use some oil. I’m not sure that you could make this with popcorn popped in the microwave. I mean plain popcorn popped in a microwave popper, not the bags of microwave popcorn. Of course you can’t doctor the bags of popcorn. I often make popcorn in the microwave because it doesn’t require any oil. It’s like air popcorn.

What oil to use?

The ingredient list says oil of choice. The original recipe just called for vegetable oil but I used coconut oil in this many times and it works great. The popcorn also tastes great when popped in coconut oil.  My current batch was made with avocado oil because that’s what I had. It also worked well.

What popcorn to use?

You can use any regular popcorn that you can pop. I usually buy organic popcorn (Trader Joe’s carries this) or I buy Amish popcorn. I like to buy non-GMO popcorn but that’s a personal preference. I used to buy a tub of popping corn from the Boy Scouts but I no longer know any scouts selling popcorn.

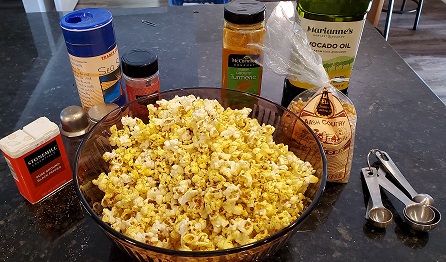
Curry Popcorn

This popcorn is even better the second day, after making it the day before.

Ingredients

  • 1 tsp cumin, ground
  • ½ tsp red pepper flakes
  • 1 tsp black pepper
  • ½ tsp turmeric
  • 1 tsp salt
  • ¼ cup oil of choice
  • ½ cup unpopped popcorn

Directions

Mix the spices together.

Curry Popcorn

Heat oil in a large pot with a lid. Add one or two kernels. When the kernels pop, add the rest of the popcorn. When those kernels are getting ready to start popping, add the spices.

Curry Popcorn

Shake the pan continuously until the popcorn quits popping.

Pour into a bowl and enjoy.

Curry Popcorn

Important Note:

  • Do NOT breath in the fumes of the heating spices and do NOT put your face over the pot.
  • Use a sealed lidded pot if possible, one without a vent.

Storage

This does make a lot so if you’re going to not eat this in one sitting, you can store it in a large plastic bag or a bowl with a lid. If it doesn’t get moist, it will last for a few days.

Variations

Stir in two minced garlic cloves

Use a different spice combination. Mix together:

  • ½ tsp cumin
  • ½ tsp coriander
  • ½ tsp paprika
  • ¼ tsp cayenne

Or try a spice combination of your own creation. I wonder how a pumpkin pie spice blend would work.

I think this popcorn makes a great snack. It’s flavorful and not covered in butter. Let me know if you try it and what you think.

Zucchini Casserole Recipe from Marcia Allen

Looking for a delicious zucchini casserole recipe? A few weeks ago I mentioned that my zucchini plants were doing well. Wow, the zukes are coming in strong now.

A special thank you to Marcia Allen who posted a couple of great recipes in the comment sections of that post yesterday.

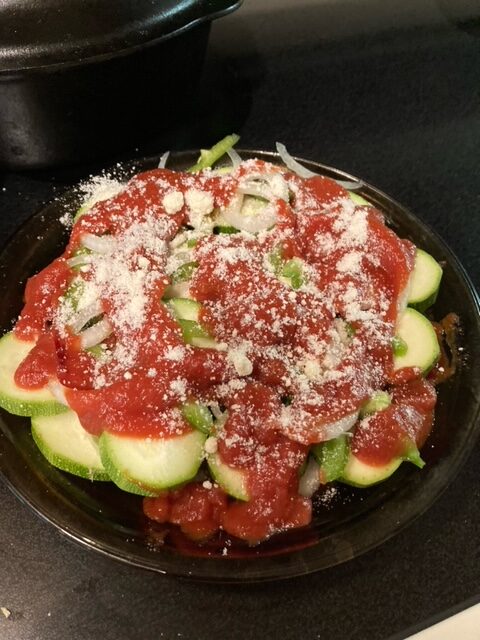
I tried the casserole and am posting my step by step photos here. Immediately I realized I don’t have the right cheese (Shredded Parmesan or Asiago Cheese), but I did have just a bit of a sprinkle of Parmesan cheese to add to it. When I make it again, I’m going to use the right cheese because I know it’d be even better!

First I cut the zucchini into round slices, zucchini casserole slicesThe sprayed some olive oil onto the bottom of a glass round pie plate and added some marinara sauce and then laid in the slices.

Then I sliced very thin slices of a sweet onion and a green pepper to top the zukes.

Added more sauce to the Zucchini Casserole and repeated with more zucchini rounds, onions and peppers.

Topped with more sauce and then the sprinkle cheese.

Baked at 350 for 45 minutes.


Delish!! This is also a great veggie challenge recipe too, if you’re challenging yourself to add more vegetables into your meals.

« Older posts

© 2026 Becoming Elli

Theme by Anders NorenUp ↑