Category: Product Review (Page 1 of 2)

A Review of the Blueberry RX Bar

Road Trip Fuel: A Review of the Blueberry RX Bar

I recently took a long weekend road trip from Ohio to Rhode Island—about 600 miles each way. On drives like this, I know how easy it is to fall into the trap of grabbing fast food or relying on vending machines at rest stops. Most options along the highway are high in sugar, salt, and fat, and they rarely leave me feeling energized.

To avoid that, I packed a small carton of Blueberry RX Bars. I wanted something convenient that would take the edge off my hunger without derailing my healthier eating habits.


Why I Chose the RX Bar

When I travel, refrigeration isn’t always practical. Protein bars are one of the easiest solutions, but not all of them are created equal. I like RX Bars because they have a short list of recognizable ingredients. The Blueberry flavor includes:

  • Dates (for natural sweetness)

  • Almonds and walnuts (for healthy fats and crunch)

  • Egg whites (for protein)

This particular bar packs 12 grams of protein, which is impressive for a non-refrigerated option.

rx bar nutrition and ingredients box


Taste and Satisfaction

I’ll be honest: not all protein bars taste great. Some are chalky, dry, or overly sweet. But the Blueberry RX Bar surprised me. It had a chewy texture, was naturally sweet from the dates, and the blueberry flavor was strong without being artificial.

At 180 calories, it offered more staying power than a piece of fruit or a small yogurt—both of which are healthy but harder to find on the road. One bar was enough to hold me over between stops without leaving me sluggish.


Convenience Factor

For road trips, convenience matters as much as nutrition. The RX Bar doesn’t need refrigeration, doesn’t melt in the car, and fits easily in a glove box or travel bag. That made it far more practical than trying to find fresh, healthy options at gas stations.


The Blueberry RX Bar isn’t meant to replace a full meal, but it’s an excellent travel snack that balances taste, protein, and convenience. For anyone hitting the road, this is a smart alternative to fast food or vending machine fare.

If you’re planning a trip, consider tossing a box into your bag. Your future self stuck on I-80 in the middle of nowhere will thank you!

Have you tried the RX bars? What did you think? Leave a comment below. – Thanks! Chris

Tracking Food with Cronometer

I wrote about tracking food in the very early days of the Becoming Elli website. I wrote a blogpost entitled Counting Calories or Eat Less and Move More.  At that time, I was using SparkPeople for tracking my food. I stuck with that app because I had a large body of data in it. I had created recipes and lots of favorites. It was easy to use. Five years later, I’m now tracking food with Cronometer.

Unfortunately, SparkPeople closed its doors for food logging. It changed its focus and no longer provided a free tool for tracking food.

Within the past year, I tried logging food on the Fitbit app. It was ok but I definitely prefer tracking food with Cronometer.

Some of the reasons why I prefer Cronometer is that I can see my macros by food item and by meal. The Fitbit app just gave me the macro breakdowns for the day so I couldn’t tell which meal was low or high in protein or fat.

Logging food is easy. I can tag foods as favorites so they are easy to find. It also lets you swipe a bar code on the product and gives you the nutritional information right away.

One thing I noticed with the Fitbit food logger was that it also provided bar code scanning but often misread the bar code. I’d have to swipe the code several times to get the correct food. Cronometer is much more accurate.

The other feature I really like about Cronometer is the ability to import a recipe from a different website. You simply paste the URL into the field and it creates the recipe for you. You can modify the recipe if necessary but it’s so much easier than having to enter an entire recipe manually.

I use the Android version of Cronometer and I don’t know if the Apple version is different. Sometimes, I access the Cronometer website on my computer. It’s easy to use there too.

I’ve been working hard on tracking food for the past six months. I can see very quickly when I’m overeating or under-eating. I also like seeing how much protein and fiber I get each day. It’s a challenging habit to create because food logging takes work. It helps to use a tool that makes it a bit easier.

Let me know what tool you use to track food.

Tracking Food with Cronometer

Lava Shorts Review

I’ve been using my Lava Shorts for a while now and thought I should write a review of them.  I’m not a strong swimmer but I’ve been trying for a while now.

Lava shorts are basically wetsuit shorts. They’re made from neoprene. The point of wearing them is that they help make you more buoyant. They lift your hips to help with swimming. Since you can’t wear a wetsuit in a pool, these shorts help simulate that to help with training for open water swimming.

lava shorts

For some reason, I blocked on the name Lava Shorts and simply called them my “floaty pants.” They do make a noticeable difference in your swimming style.

I think if you’re training for a triathalon or if you have issues with keeping your hips up while swimming, investing in these shorts is worthwhile.

They’re not particularly inexpensive. I found them on Amazon at around $80.

Here’s what I dislike about them. The Lava Shorts are unisex so that supposedly they fit both men and women. I think they’re actually designed for men and it was easier to say they’re unisex.

I had to go up in size to get a pair that fit my hips. When I wear them, I really need to yank tight the string tie at the waist because they feel like they’re going to fall down. Basically, they fit around my hips but then the waist is weird. They don’t actually reach my waist. They hit me between my hips and waist so they feel awkward.

I don’t want you to think that they’re loose because they’re not. I squirm around to get them on and then tighten up the waist as best I can. That’s the nature of neoprene suits. They’re supposed to be snug.

Once I’m in the pool, they don’t feel too bad though I notice that I am sometimes tugging them up when I stop swimming. I have had them work loose and had to stop to yank them back into place. Nothing like standing in a pool, pulling your shorts back up.

I’ve never mastered flip turns so I can’t tell you how these do with them.

If you need help with elevating your hips in the water, try these or if you know you’re going to be wearing a wetsuit in open water, try these.

I’m not sure they’re worth the investment if you just want to swim laps.

If you wear lava pants, let me know how you do with them. If you just like to swim, let me know that too.

Trying Out the Peloton App

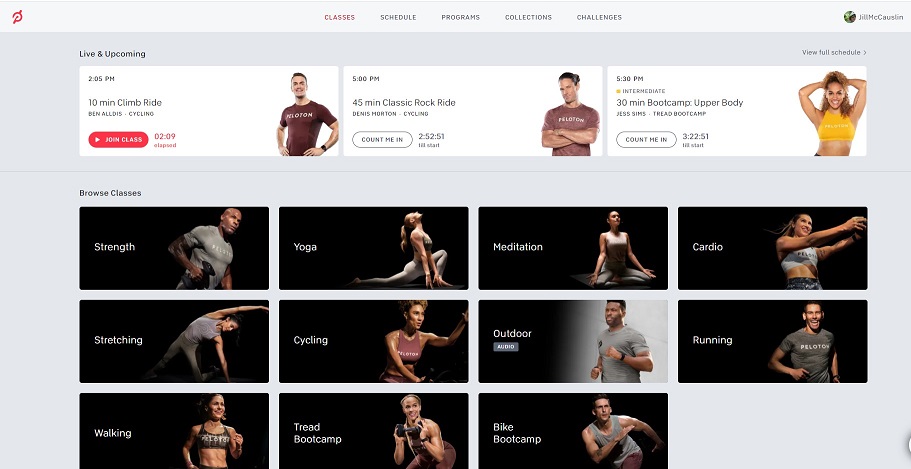
I got a free 30 day subscription so I’m trying out the Peloton app. I don’t have the Peloton bike or treadmill but my daughter-in-law suggested that I try out the exercise classes on the Peloton app or website.  The classes are led by instructors and include a wide variety. I’ve been trying out different ways of getting a workout so I liked the idea of trying the Peloton classes.

Categories

There are different categories for each class:

  • Yoga
  • Strength
  • Stretching
  • Meditation
  • Cardio
  • Cycling
  • Outdoor (audio only obviously)
  • Running
  • Walking
  • Tread Bootcamp
  • Bike Bootcamp

So far I have tried classes in the yoga, strength, and stretching categories.  Once you’re in the different categories, the classes are then grouped by body parts such as core, quads, hamstrings, arms, etc.

I like that the individual classes tend to be short. So far I’ve taken classes that range from 10 minutes to 20 minutes.

Once you’ve identified the classes that you want to take, you can select them and put them in a Stack. The classes are then listed there and you can move from one to the next without problem.

Trying Out the Peloton App

The classes are well done. They tell you in advance what equipment you need. I took one class that required a dumbbell which fortunately I had. Most of the classes have just needed a mat and use bodyweight.  The videos are well done and I think the instructors do a good job of explaining what they’re doing.

I noticed that the instructors give advance warning of what’s going to happen next. If your mind wanders, it’s possible that you might get a big confused by that at times. I don’t want to say that’s what happened with me but I am a daydreamer by nature.

I struggle with doing workouts at home but these worked pretty well. Part of the problem with working out at home is that my dog Penny just goes bonkers when I get on the floor. That seems to be a universal trait for dogs. Try doing yoga in your living room and soon there’s a dog trying to join you in downward facing dog.

Also, you can slack off in class because nobody is actually watching you. So it depends on your personality, I suppose.

Conclusion

I’m using the 30-day free subscription. Hopefully it won’t be hard to cancel. If it is, I’ll update my review with that information. After that, it costs $12.99 (US) as of today. This could certainly change. It’s less expensive than most gym memberships but of course the gym provides the equipment.

I think the classes are well produced and the instructors are good. If you like working out at home, this might be a good fit for you. For me, it reminded me why I like to go to the gym so I’m going to cancel the membership.

A member of the Becoming Elli Facebook Group is using HasFit. It sounds like a similar program but is a bit less expensive. I’ll check that out next and let you know.

Let me know if you’ve used the Peloton workouts and what you thought or let me know if you’re using a different at home program.

A review of Mary’s Gone Crackers

A review of Mary’s Gone Crackers? Have I gone crackers? A good question, I suppose, but I love these crackers. They’re crispy and they taste great alone or with a topping. I like to smear goat cheese on them for an easy snack or as a side dish with a bowl of soup.

I frequently pack them in my lunch. They’re great with my usual salad. A co-worker asked about them and I gave her one to sample and now she’s a convert too. We sit together in the lunch room and munch on our crackers.

Mary’s Gone Crackers

These crackers are gluten free, nut free, egg free, and dairy free. They are a great vegan snack.

I like these crackers despite being free of everything. Rather, I like them and being gluten free, etc. is a bonus, I guess.

Mary's Gone Crackers

Mary’s Gone Crackers are vegan, kosher, and non-GMO.

The ingredients for the original cracker are:

Organic whole grain brown rice, organic whole grain quinoa, organic brown flax seeds, organic brown sesame seeds, filtered water, sea salt, organic wheat-free tamari (water, organic whole soybeans, salt, organic vinegar).


NUTRITION

A serving is about 13 crackers and has 140 calories.

  • Serving Size: 13 Crackers (30g)
  • Calories 140 calories
  • Calories from Fat 45 calories
  • Total Fat 5g
  • Saturated Fat 0.5g
  • Trans Fat 0g
  • Cholesterol 0mg
  • Sodium 190mg
  • Potassium 160mg
  • Total Carbohydrate 21g
  • Dietary Fiber 3g
  • Sugars 0g
  • Protein 3g

So, probably a bit high in carbohydrates if you’re following a low carb diet but otherwise, it looks fine to  me.

Variety

There are now a good variety of these crackers, including herb, black pepper, and a line of Super Seed crackers. My favorite remains the original crackers.

Be sure to check out the Mary’s Gone Crackers website. They apparently have coupons sometimes and you can make a purchase online. You can also search for stores in your area.

Just a note on that. I buy a large box of these crackers at Costco, which did not show up on the area map. The regular grocery stores showed up but  not Costco. If you’re a fellow Costco shopper, buy these crackers there. It’s the best deal, I believe.

The website also includes some tempting recipes.

So, if you’re looking for a good snack cracker, check out Mary’s Gone Crackers. You will enjoy them!


Nuun Sport for Replenishing Electrolytes

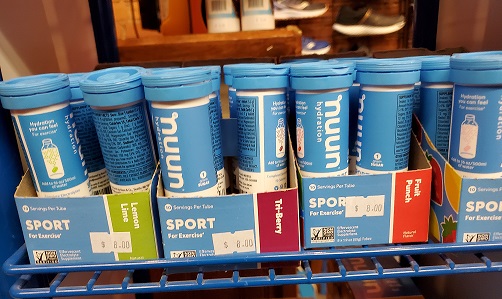
I first picked up a tube of Nuun Sport tablets at the expo for the Akron Marathon. Boy, do I enjoy a good race expo. You can see what’s new in the world of running and choose from a variety of products. Lots of gadgets and accessories galore. There’s also lots of energy gels and electrolyte options. I bought a tube of Nuun tablets from one of the exhibitors, along with some other goodies.

Nuun tablets are meant to be dissolved in your water bottle. They’re similar to Alka Seltzer in that you drop a tablet into water and it fizzes until eventually the tablet dissolves.

It can take a while for the tablet to completely dissolve. I find myself sometimes shaking the bottle, trying to hurry up the whole process. Come on, I want to drink this now! I suppose this means I should do a better job of planning how to use Nuun for replenishing electrolytes.

Nuun Sport

Nuun Sport

What do I like about Nuun? I like that it’s fairly light. The flavors aren’t overpowering. It also doesn’t have a lot of sugar or sugar replacements in it.  The Nuun website says that they were the first to separate electrolyte from carbohydrate replenishment. Therefore, all of the sugars that are in Gatorade or PowerAde aren’t part of Nuun.

I also like the fact that the tablets are scored so they can be cut in half. That way you can slide the tablet into a small opening or only use half a tablet.

Nuun comes in a small tube with a screw on lid. That makes it easily transportable and it can fit in a pocket or running belt. I did throw one into my purse and the lid eventually worked its way off and I had to rummage around to find the tablets and then throw them away. I do not want to eat anything that’s been bouncing around inside my purse.

Flavors

Apparently, this product is a success because their list of flavors continue to grow. Some of the flavors they currently sell are:

  • Cherry Limeade
  • Citrus Fruit
  • Fresh Lime
  • Fruit Punch
  • Grape
  • Lemon Lime
  • Mango Orange
  • Orange
  • Strawberry Lemonade
  • Tri-Berry
  • Tropical
  • Watermelon
  • Wild Berry

Ingredients

Each electrolyte tablet contains the following: sodium (360 mg), potassium (100 mg), magnesium (25 mg), calcium (13 mg), vitamin c (38 mg) and sugar (1g).

Serving Size: 1 tablet in 16 oz. of water

Potassium: 150 milligrams

Sodium: 300 milligrams

Calories Per Serving: 15

Notice that some of the flavors have caffeine in them.

You can check the website for ways to buy Nuun. I noticed that it’s available around me at running stores and grocery stores, including Walmart. So, they shouldn’t be too hard to locate. Plus, you can order them directly from the Nuun website: www.nuunlife.com.

I like Nuun Sport. The flavors that I’ve tried are light and refreshing. They don’t have that cloying taste of the sweeter drinks. Also, I like that it doesn’t have a lot of sugar or carbs. That way I can separate my need to replenish electrolytes and to refuel with carbs.

I do like the tube that they come in, even if it did fall apart in my purse. Lesson learned, don’t carry it around for weeks without using it.

There’s so many flavors that I’m going to have to try a new one.

Do you use Nuun Sport? What do you think? Let me know by commenting here or on our Facebook page. You can email me at jill@becomingelli.com.


Two Delicious Recipes to Satisfy the Pumpkin Pie Spice Craving

In the autumn I am one of those people who seeks out a pumpkin pie spice fix. Knowing that a pumpkin spice latte at the local coffee shop has way more empty calories than I need, I’ve looked for other ways to satisfy this itch.

Both of these recipes utilize the Vitamix blender, which is one of my very favorite appliances that I’ve ever received as a gift. (Every since the year I received a toaster and a vacuum ar a birthday gift, my practical husband has been more careful about buying me appliances as a gift.) The Vitamix brand is pretty pricey, so he ended up getting a reconditioned one that has served us well for more than 5 years.

You probably can make either of these recipes using a NutriBullet or another type of blender.

Pumpkin Pie Spice Smoothie

With just three ingredients, it’s a simple go to for when I want something with pumpkin sweetness. It’s funny, but this recipe doesn’t actually have any pumpkin in it.

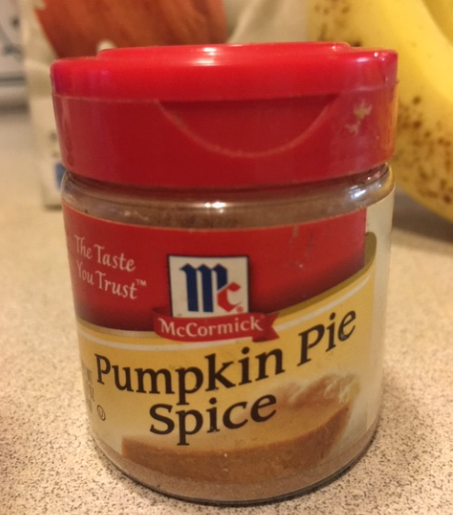
Ingredients: Almond milk, banana and pumpkin pie spice.

Directions: Add all three ingredients to the blender and turn on for about 2 minutes. Using less milk gives a very thick smoothie. More milk and less banana gives a thinner texture. It’s up to you.


Pumpkin Pie Spice Squash Soup

Make it it in the fall. This thick soup tastes just like pumpkin pie filling to me! It provides lots of fiber and extremely delicious. Using the Vitamix blender, it is a 6 minute recipe, if you bake the squash ahead of time. I like using butternut and acorn squash the best.

I usually don’t measure, so my quantity and texture varies to match my mood.

Ingredients:

  • Squash (butternut, acorn and/or zuchinni)
  • 15 oz can of pure pumpkin
  • dash of vanilla
  • some (1/2 cup?) almond milk
  • big dump (2 teaspoons?) of pumpkin pie spice

Directions:

The night before, bake your squash.

Cut squash in half, scrap out seeds. Place inside face down on tinfoil covered cookie sheet and bake or roast the squashes in the oven. I figure 40 minutes at 350 to 375 degrees. It depends on the size of the squashes and how accurate your oven is. Refrigerate.

(You can make this all in one night, but I like to prep some ahead of time and just do the final prep all on the night I’m going to eat it.)  Then on the night you are making the soup you just assemble the ingredients into the blender.

  • Put almond milk in the bottom of the blender. With liquid in the bottom, it blends better.
  • Scoop the squash out of the skin.
  • Add 1/2 or a full can of pure pumpkin (NOT pie filling, just plain pumpkin) in a 15 oz can.
  • Add a dash of vanilla, a little more almond milk and a big dump of pumpkin pie spice.

Set blending on soup mode and turn on.

If its too thick, stir in a little more almond milk. Too thin, more pumpkin or squash, if you have it.

Do you love pumpkin pie spice as much as I do? Share a link to your favorite recipe. Hate pumpkin spice? (Sorry!) Let me know what you like better when the seasons change.

Disclosure: this post links to the Amazon affiliate program, where a portion of your purchase helps to offset the expenses associated with the Becoming Elli podcast and website.

Pros and Cons of the Elliptical

Podcast Episode 17 – Pros and Cons of the Elliptical

Podcast: Download | Play in New Window
Subscribe: Apple Podcasts  (iTunes) Google Podcasts | Android-Google Play | Stitcher | Player FM Castbox | Tunein | Spotify | RSS

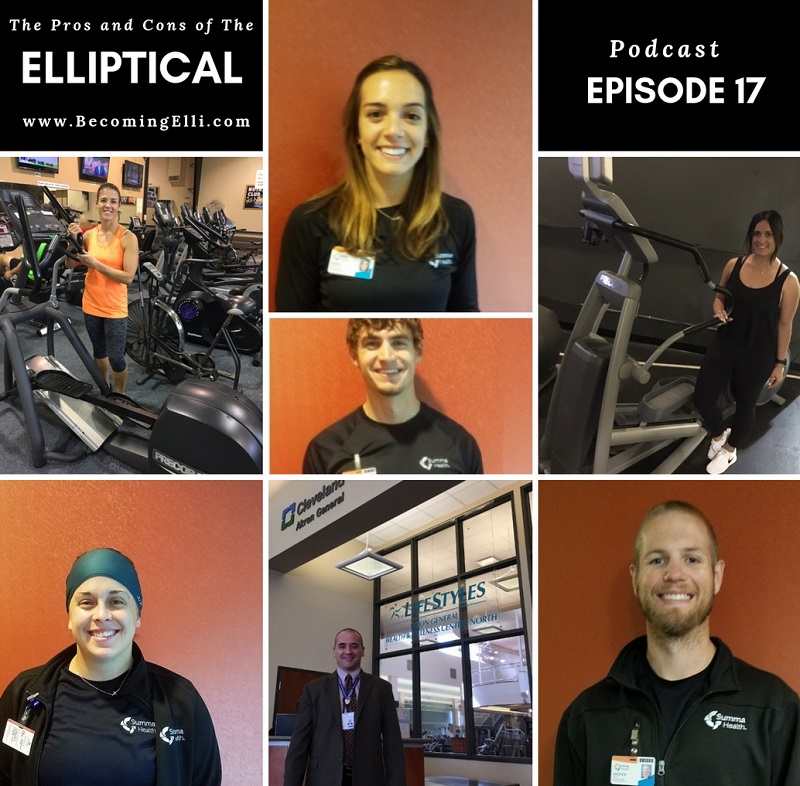
Controversy surrounding the Elliptical was started inadvertently in Episode #5 when Brian Kennel mentioned his thoughts on the Elliptical.  In Episode #17 of the Becoming Elli Podcast, Chris and Jill look for answers when they interview a series of experts on their opinions about the use of the elliptical for women over 50.

In this episode you will hear:

  • The pros and cons of the Elliptical Machine
  • What to use instead of the elliptical
  • Mistakes people sometimes make
  • How to get a great workout on the elliptical
  • Why some people do not recommend the elliptical for women over 50

Experts interviewed include:

  • Sara Renard has her Group Fitness Instructor Certification from AFAA (the Aerobics and Fitness Association of America), Personal Trainer certification from NETA (National Exercise Trainers Association.) She is responsible for all of the group fitness instructors at LifeCenter Plus.
  • Andrew Oravec is a personal trainer, exercise specialist, and group fitness instructor at Summa Wellness Center and has a Master’s Degree in Exercise Physiology from University of Akron. He is a Certified Exercise Physiologist by the American College of Sports Medicine.
  • Jennifer Stefanik is President of Central Wellness and has her Bachelor’s and Master’s Degree in Exercise Physiology from Kent State University. She is a Certified Group Exercise Instructor and Certified Health Coach through American Council on Exercise.
  • Maria Stadelman is a personal trainer at Summa Wellness Center and has a bachelor degree from Ohio University in Exercise Physiology. She has been an athlete her whole life. Maria was interviewed on Episode #1 of Becoming Elli and many women are still downloading and enjoying listening to this episode.
  • Suzanne LaChance is a fitness specialist, personal trainer and group exercise instructor. She is also a certified Zumba instructor and is Certified by the American College of Sports Medicine as a Exercise Physiologist. He holds a Master’s Degree in Exercise Physiology from the University of Akron. She works at Summa Wellness Center.
  • Jacob Weatherbee is a fitness specialist who has a Bachelor’s Degree in Exercise Science from the University of Akron and has a certification in Exercise Physiology through American College of Sports Medicine. He also works at Summa Wellness Center.
  • Mark Feakes is the Director at LifeStyles North at Cleveland Clinic Akron General. He has a Bachelor of Science in Athletic Training from the University of Akron and has many years of experience as a certified personal trainer as well.


Prices for various Elliptical Machines vary. Here are some elliptical machines that may be workable for home use.
Disclosure: these photos link to the Amazon affiliate program, where a portion of a purchase might help offset the expenses associated with the podcast and website.

Review: Aftershokz Trekz Air Wireless Bone Conduction Headphones

I returned from my trip abroad this summer and apparently my boyfriend missed me because he bought me  a pair of Trekz Air Wireless Bone Conduction Headphones by Aftershokz as a welcome home gift. I felt a little guilty because I brought him some souvenir gifts from Italy but I scored the fancy present.

Wireless Bone Conduction Headphones

I’ve talked before about my running playlist. I enjoy listening to music or podcasts while I’m running. Last summer I bought a pair of Plantronics Bluetooth headphones for running and I really liked them. They have ear buds though which means that it makes it harder to hear what’s going o around me plus I’m always fiddling with the earbuds. I can deal with the earbuds when running on a treadmill but I like to run on local trails. I began to worry about safety while out running by myself. So, I tried running with just one earbud in and that worked OK but was not the best solution.

Shortly after buying the Bluetooth headphones, I went to a talk held at a local running store and while I was browsing, I saw these wireless bone conductive headphones. They had a sample there to try and I was thrilled by them and then sorry that I had just spent my headphone money on the earbuds version of Bluetooth headphones.

Wireless Bone Conduction Headphones

So, what are bone conduction headphones? They are headphones that rest just in front of the ear. The headphones conduct the sound through the bone so you hear while bypassing the eardrum. I thought that was the coolest thing. The advantage of them is that you can hear your music or podcast but also hear everything going on around you because your eardrum is not blocked by the earbuds.

Wireless Bone Conduction Headphones

I love these headphones. They’re so light that I have forgotten that I’m wearing them. I realized the other day that I’d been walking around for quite a while with them still on my head.

The sound is good. I can listen to my running playlist at a low to moderate volume and hear it without problems. I think it sounds good with a good range of bass and treble. I’ve checked with a couple people and they have reported that they can’t hear the music so that’s a relief. I hate walking around with everyone being able to hear my sometimes-embarrassing playlist. That happened a lot when I was only wearing one earbud.

I like that I can talk on the phone while wearing them. Again, I’ve checked with a couple people and they say I sound great on their end.

They charge with a mini-USB charger. So, this might be a negative. I’ve noticed that the headphones won’t charge using the cord that I use to charge my phone and everything else I own. I’ve had to use the cable that came with the headphones. That’s fine as long as the cable doesn’t get lost. That’s been known to happen when people come to visit and want to borrow a charging cable.

The controls for these headphones are small buttons on the stem and on the actual piece that rests on the bone. This is my complaint with all Bluetooth headphones. I tend to forget which button does what so I’m often fumbling with the buttons and looking like an idiot. The controls on the Trekz Air seem to be somewhat easier to use but we’ll see what happens when I want to answer the phone while I’m out running.

I’ve worn them running and they were great. While wearing my sunglasses, hat, and headband, I added the wireless bone conduction headphones. They were comfortable and I heard the music without problem. I also conducted a lengthy conversation with someone without having to remove the headphones. I did get sweaty while wearing them and they continued to work fine. I’ve not worn them in rainy weather yet so can’t address that.

The Details

The Trekz Air Wireless Bone Conduction Headphones by Aftershokz cost somewhere between $90 and $120, based on my searches on Amazon. Apparently there are some different models and colors so the price seems to vary. I see that there are other brands of the same kind of the wireless bone conduction headphones but haven’t tried any of them.

The box includes the headphones, the charging cable, a carrying case that zippers, instructions, and ear plugs. The instructions say to use the ear plugs when it is safe to block out ambient noise such as being on a train or airplane.

Wireless Bone Conduction Headphones

I highly recommend the Trekz Air wireless bone conduction headphones. They’re lightweight, comfortable, and allow you to listen to your playlist or podcast and still be aware of what’s happening around you.

Wireless Bone Conduction Headphones

My Experiences with Kinesiology Tape

Have you noticed people running and biking with kinesiology tape on their legs, ankles, knees or shoulders? Ever wondered if it works?

After I noticed people with tape, I was curious. Does it work? Does it hurt? How do you put it on?

In my experience, it makes a HUGE difference to my recovery and prevention.

When I’m going on a run, I like to have my right Achilles tendon taped with kinesiology tape. I don’t always use it on a bike ride, but I do if there are hills.

Kinesiology tape helps to increase the blood circulation and reduce inflammation for faster healing. I find that it works well for preventing new flare-ups.

The tape stretches like an elastic, so it moves as you move. It lifts the skin and makes a space between the dermis layer and the muscles which takes some of the pressure off and helps with drainage and blood flow.

I was taped for the first time a few years ago. A friend of mine, who had just taken a course on kinesology taping, asked if she could tape my calf and ankle. She acted like I would be doing her a favor by letting her practice on me. We had just taken a long, strenuous bike ride up some serious hills, so I jumped at the chance to see if it made a difference. In the next few hours, as we enjoyed a post ride beer and chatted, I honestly didn’t notice anything at all.

But the next morning, I remember waking up the next day being AMAZED at how great my Achilles felt!

Instead of being stiff and sore like it usually was when I put my heal to the ground, it didn’t feel like anything. It felt totally normal, without anything. And this was after a very strong, long bike ride with some big hills.

Normally it would have been an issue.

I decided to add taping to my prevention and recovery plan, along with ice, rolling and stretching.

Since then I have learned to tape my own Achilles tendon.

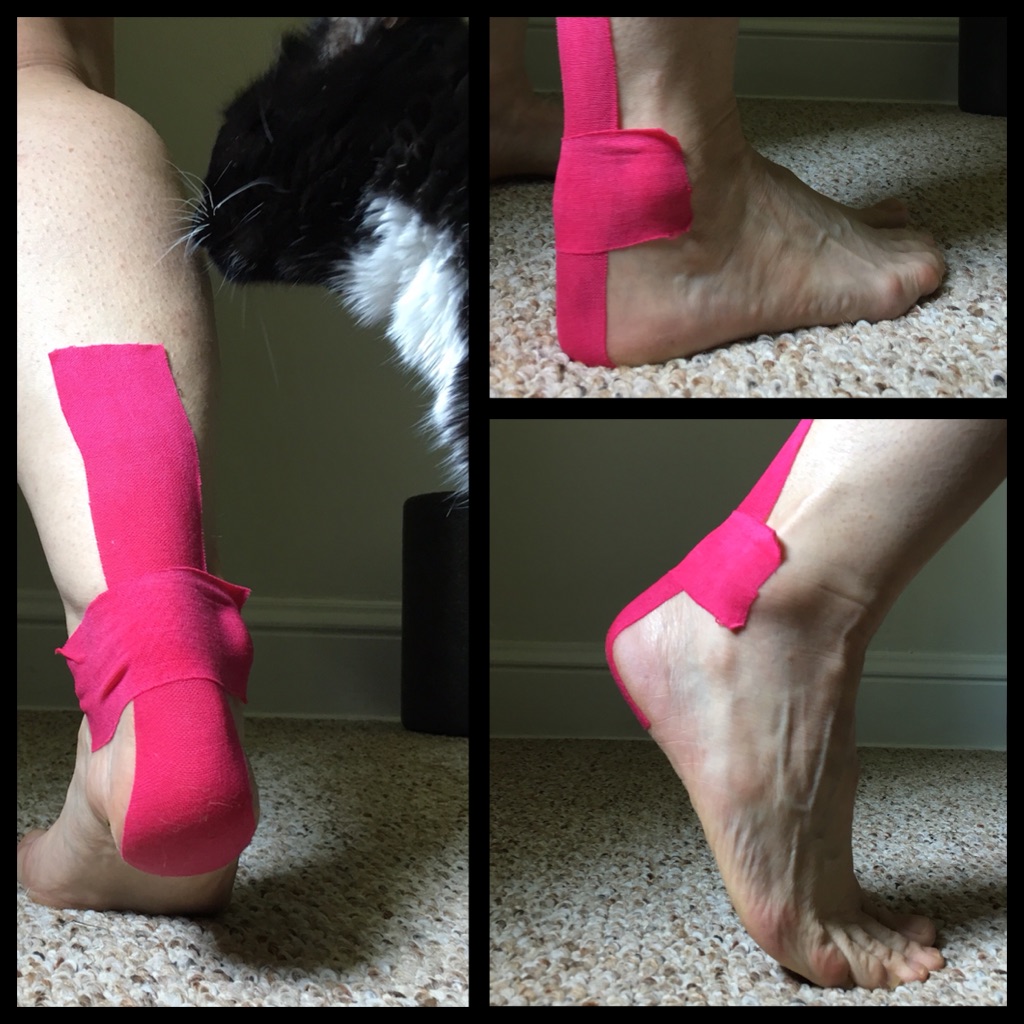
Here’s what I do when I apply tape.

  1. Before applying the tape, cut the lengths you want from the roll. I use one long one (about 8 inches) and one short one (about 4 inches).
  2. You’ll want to round the corners (I didn’t in my photos, but I should have!)  Square corners cause snagging. Socks, pants etc. will snag on the corners of the tape when you change clothes and it will start to peel.
  3. The anchor points of the tape need to have NO stretch. The middle parts of the tape should stretch.  Each brand seems to suggest a slightly different amount of stretch from 50% to 80%. It’s a guesstimate. They all agree on no stretch at the anchor point. The way you get a percent is stretch it 100% and then back off from there.
  4. To apply the tape for Achilles, you want to do the dorsiflection to get your toes are pulled up toward the shin and knee. This stretches your Achilles tendon long, otherwise the tape will tend to pull off as you walk.
  5. Apply the long tape first, starting at the heel as the first anchor. Peel off the backing from the tape, Attach the tape to your heel. Rub it down.
  6. Peel the backing off the long piece. Stretch it and back off, but don’t attach the long piece to your calf just yet. Peel the top anchor section. Touch the top anchor to the calf and apply with NO tension. Attach the rest of the tape and rub.
  7. Before applying the strip of tape across, you will score the paper backing in the middle.  Then tug with both hands to split the paper backing. This allows the stretch of the tape in the middle.
  8. Go across the lump – the painful part of the Achilles. The shorter piece goes across the most painful area to help provide relief to the most tender section. For me it is right where the little lump is just above the heal, just about where the back of my shoe ends.
  9. Give a good rub to activate the stickiness

I recommend taking the time to make the nice rounded corners. (Do as I say, not as I do!) Rounded corners keeps the tape from catching on clothing or when taking socks on and off. I like to roll my sock over the tape.

When I was traveling on vacation, I brought two sets of pre-cut tape with me. I didn’t want to bother with carrying scissors.

You can get the tape wet in the shower, however some brands work better than others. I have used several different brands and there is a difference. KT tape seems like the highest quality but also the price. I’ve also used RockTape, Spartan tape and something I bought on closeout from Amazon. Prices range for rolls from $20 for 16 feet to $7 for 50 feet. You get what you pay for… You can also buy it in precut strips which is very convenient, but of course, costs a little more.

Over the past couple of years I have purchased and used different brands and types. Here is my experience with them:

  • KT Tape Original Cotton Elastic Kinesiology Therapeutic Sports Tape
    $9.95 for 20 Pre cut 10 inch Strips, Breathable.
    Feels the best on my skin. I think it works the best. KT also has great videos on how to wrap:
  • RockTape Kinesiology Tape for Athletes, Water Resistant, Reduce Pain and Injury Recovery, 180% Elastic Stretch, 1 Roll, 16.4 Feet
    $16.24 Lifts well, stays on well and doesn’t irritate skin my skin. Good stretching. RockTape Application PDF helps explain how to apply – where and why.
  • Spartan Kinesiology Tape Perfect Support for Athletic Sports, Recovery and PhysioTherapy
    Uncut 2 inch x 16.4 feet of tape with a printed Kinesiology Taping Guide. (Here’s their 41 page guide.) Works pretty well, stays on for about 3 days.
    about $9.95 on Amazon.
  • MetaTape Kinesiology Tape, Roll
    2 rolls of 2 in. x 25 ft. Uncut $6.95 by Meta Fitness Gear. This was on close-out on Amazon.
    Can’t beat the price, but the tape doesn’t stick very well and the tape just isn’t as effective in lifting the skin.
  • Athletic tape from a bin in Play It Again Sports. No brand name, just shrink wrapped tape. No paper backing, No stretch. Less than $3.00 for a roll.
    Not at all the same thing. Don’t be confused. It gives ankle support, which is great if you feel like you’re likely to sprain an ankle, but it doesn’t move with you and seems like the opposite effect. I used to tape my ankle years ago after it healed from a sprain to give me support when I was doing an activity.

Depending on the brand of tape and how many showers I take, it can last up to 4 days before coming off.  I have noticed that the MetaTape may not even last one day.

Back in 2006-7 when I was first going to physical therapy, they only used the regular athletic tape. So I used to use that to give my ankle support. Athletic tape is not the same thing as kinesiology tape.

These tapes have a backing on them which helps in the application. You cut the pieces first, and you don’t wrap the ankle to keep it stiff. The idea is to lift the skin away from the underlying tissue and muscle slightly. This allows the fluid and blood to move more easily.

Kinesology Tape Aesthetics

Tapes come in many colors and some even have prints. On race day, it’s nice to coordinate with your outfit if the tape will show. (ha ha!)

Day to day, taller socks or slacks helps to cover it. In fact, using compression socks can help with the calf tightness which is the actual cause of the Achilles problem for me.

I don’t just use it for running, riding or working out. I like to dance at weddings, but when there is that much sitting before the band starts. (and sometimes a long drive in the car before and after.) I know that there isn’t an opportunity to do my stretching routine before getting up to dance. I like to have tape on my ankle before getting up on the dance floor, but don’t want my tape to show. A bit awkward when wearing a dress, but if you wear a long dress, or if you can wear dark tights, it solves the problem.

Yesterday I did 6 miles of running with a lot of hills in the Cleveland Metro parks. Of course, I taped up before I ran. And today, I’m happy to report, my Achilles is doing very well.

Have you ever tried Kinesiology Tape for recovering from tendon pain or preventing an injury? Let me know what your results have been.


« Older posts

© 2026

Theme by Anders NorenUp ↑