Page 30 of 65

Holiday Celebration Eating

Holiday celebration eating is a always a challenge for me… in more ways than one.

I’m always looking for a festive looking dish, meal or appetizer to serve. I usually struggle to resist some of the more traditional treats.

Yesterday I tried something different using red green and white colors – beets, celery and onions. As it cooked the white onions became translucent and as I stirred, the beet juice covered everything. I added a few left over pasta noodles and a can of tuna for protein.

I actually liked the taste, but this photo is the best looking. If there is one thing I know about food blogging, getting the right photo that looks appealing is a big part of the project.

From an actual must have recipe, this was okay, yummy enough to want to finish it, but not something I would ever crave.

And eating it was way more healthy than the holiday cookies, peanut butter fudge and kulachi that was sent to us from a friend and sat out on the counter all afternoon during Sunday football.

I also scored a win by doing all my dumbbell reps in between episodes during my Netflix binge of a ballerina murder mystery. So all around win.

How was your weekend?

holiday celebration eating

The colors are right, but the food was – well – non traditional. I added some pasta and tuna to the mixture, but this looks way more pretty than the final meal.

Visualize Your Goal

This popular holiday video shows exactly why it is so motivational to visual your goal. If you haven’t seen it yet, it’s worth the watch.

I love a lot of things about the video, except the exercise he uses with the kettlebell.

My back hurt just looking at it. I know why the ad agency decided to have him do that exercise, that way, but WOW! OUCH!

The only way I would do the kettlebell push out is after a lot of training, while under the watchful eye of a certified personal trainer and in the squat position, not standing up the way he did. And certainly not that super heavy weight. You’d need a really strong core to not hurt yourself!

Also when he first stood up with the kettlebell (40 seconds), it looked like he was using his back to lift it rather than his quads. He had the kettlebell out from his chest about a foot away. That looks like a disaster to me. When I think of doing kettlebell exercises, I think of the swing, or even the difficult Turkish get up, but definitely not the standing, lifting, front push out like he did.

Not sure how old this man is, but my guess is 70 or so. Seeing him pick up the kettlebell, or try to pick up the kettlebell in the beginning of the video made me think, he needs to work up to that heavy size! While it’s important to visualize your goal, it is also important to work up to it. I know I can’t do a 25 pound until I’ve got a good hand on the 20 pound… and I don’t use a 20 pound, until I’ve mastered the 15 pound. I guess when I visualize my goal, I see it in baby steps.

I did notice in the end when he lifted his granddaughter, he lifted her to a standing position and then tightened his core to do a push press.

*I’m not a personal trainer, or a physical therapist, but I wouldn’t suggest trying the standing push out unless you checked with someone who knows.

Meanwhile, the point is to visual your goal to improve motivation. I’ve heard of vision boards doing just that.

As we’re approaching the new year, I am getting ready to pick a new word (or 3 words) for 2021. This past year my word was resilient. Next year my word may be visualize. Or maybe it will be kettlebell?

The First Steps to Losing Weight

What are the first steps to losing weight? You’ve decided that you need to lose some weight and now you need to figure out what the first steps are. Sometimes the hardest thing to do when you’re trying to make any kind of change is to simply start.

Do You Need to Lose Weight?

The first step is probably to determine if you actually need to lose weight and why you want to do so. If your doctor has told you that you need to  lose weight, then you probably need to do so. When you realize that your clothes have become tight or you need to buy larger sizes, you probably might consider losing some weight. If you just don’t like how you look, maybe you need to do some strength training instead of dieting.

Once you’ve decided that losing weight is appropriate, what do you do? If you’re like many of us, maybe you decide that you’re going to quit eating everything you like and only eat celery sticks because you remember being a teenager and someone saying that you burn more calories chewing celery than you intake from the celery. (I don’t know if that’s true but I still remember being told that.) If you end up with a diet of celery, sugar free jello, and some wilted lettuce, you need to rethink this.

Before You Start

If you’re going to do this, make sure you can determine how you’re doing. Before you start, do all of the following:

Weigh yourself. If your goal is to lose weight, make sure you know where you started.

Measure yourself. I suggest measuring your chest, waist, at your navel, and hips. You will be able to see results if you measure, even when the scale doesn’t seem to be moving.

Take photos. Use some judgment here because you might want to share some of these later in before and after photos. I suggest that you wear a bathing suit or sports wear. You want to be able to see your body but you want to be able to let others see as well. Don’t forget to take a full body shot and get a good picture of your face.

The First Steps to Losing Weight

Here are some things I’d suggest that you do first.

Track what you’re eating

Use an app like My Fitness Pal or LoseIt! to track your food for a few days. You can also log your food in the Fitbit app as well. The software will tell you how many calories you’re eating, how much fat, protein, and carbohydrates you’re ingesting, and some sense of what kind of nutrition you’re getting. Do that for a few days and then look at the numbers. Where are you overeating? When are you eating? Just get a sense of what you’re doing and what is the easiest to change.

Start Small

Look at what you’re doing and figure out something you can change. Maybe it’s to eat fewer potato chips and substitute in an extra vegetable at a meal. Maybe you see that you’re taking in a lot of calories at that late night snack. If you really want that snack, is there something you can eat that’s a bit lighter? Maybe you can just eliminate that snack.

Drink More Water

Drink some extra water. If you read enough or listen to people about losing weight, they’ll tell you to increase your water consumption. Before you begin drinking a gallon of water every day, just increase what you’re drinking moderately. Let your body adjust to a bit more water. If you’re drinking soft drinks, try to replace some of them with a glass of water.

Look for some support

Making changes in your life can be challenging and finding others who are doing the same definitely helps. Feel free to join the Becoming Elli Facebook group and post there. We’ll help you as best we can. You can pay for a community. For example, WW (formerly Weight Watchers) and Noom both offer communities of people who are doing the same program. This might be a good place to turn when you’re starting out. Remember that you’re not obligated to do the same thing forever so use what works for you now and worry about next year when it gets here. A free option is the LoseIt community on Reddit. There’s lots of free information there and lots of support. I bookmarked that subreddit years ago and still pop in to see how people are doing.

Be Willing to Make Changes

I think when you’re first starting to work on losing weight, you don’t need to decide you’re going to go Keto or vegan or paleo. Certainly, you may decide at some later point to try one of these ways of eating but when you’re first starting, I think you need to just give it a try. You can begin to learn more about healthy eating and different ways of eating and then begin to try them out. There is plenty of this kind of information in our podcast. Go through the old episodes and pick out some that you find interesting.

Here’s an important thing to remember. It’s better to make small changes that you can sustain than to totally revamp your life, do it for a few weeks, and then give it up because it’s too hard. You can make changes that help improve your health. Slowly figure out what works for you and don’t be afraid to change what you’re doing.

There you have what I think are probably the first steps to losing weight. Did I miss something? What would you suggest?

Mountain Biking and Being Fit with Jane Crawford

Mountain biking – Episode 72

Download | Play in New Window
Please Subscribe: Apple Podcasts  (iTunes) | Google Podcasts | Amazon Podcasts | Android-Google Play | Audible |  Stitcher | Player FM | Castbox | Tunein | Spotify | RSS

In episode 72, Jill and Chris talk with Jane Crawford, a mountain biker and a Recreation Therapist who lives in Calgary, Canada. She walks the talk about wellness and healthy living. As a Recreation Therapist she has learned the clinical tools to support those with chronic health conditions and been able to use those tools in her own life.

In 2008 she set the goal of 10,000 steps a day and continues to do this today. In 2010, she used a simple check mark on the kitchen calendar of completing 30 minutes most days for physical activity. This simple way of holding herself accountable has lead her to become a triathlete and a passionate mountain biker.

We talked about the challenges of staying fit. She shared with us tips and tricks that she uses to stay fit, including:

  • Strength Training
  • Cardio
  • Exercising before getting home from work
  • Ways she gamifies exercise

Links mentioned in this podcast:
Zwift app for indoor cycling (Please let Jill know if you want to ride in a Becoming Elli Group)
Becoming Elli Private Facebook Group – You’ll need to answer a few questions before joining the private group.

Like so many of us, Jane has fun and works hard at staying fit after 50.

Getting Back to Basics

After a really busy November, a conversation I had with Jill made me think it’s time for me to get back to basics. I find it’s easy to get caught up in the extreme or the minutia of exercising, healthy eating and motivation. Sometimes when I start overthinking, I stop doing.

What is back to basics? For me, back to basics means seven things:

1. Drink water. I like to feel my bike water bottles, and put a rubber band around them so I know how many bottles I finished per day. Using my bike water bottles also reminds me of all the fun I have biking.

2. Stand up and walk at least 250 steps each hour. My FitBit around my wrist reminds me at 50 minutes past the hour if I’ve been sitting from more time than I should have. When I was really fit, it meant go biking or running or some other form of cardio 50 to 60 minutes a day, however, that is not my current situation.

3. Get 7 1/2 hours sleep. Again I check my FitBit that tracks the dreaming and deep sleep and I always am hopinf for at least an hour of deep sleep and an hour of REM sleep. When I get good overall hours, as well as at least 60 minutes of each deep and dreaming sleep, I have a great day the next day. If not, I find I’m moody and more hungry than I normally am.

4. Eat my vegetables. My easy way to do that is to make a veggie salad, or if I’m feeling too lazy to chop lots of fresh veggies, I buy a bunch of frozen vegetables already sliced.

5. Skip desserts and excessive amounts of bread. I try to eat carbs early in the day and after exercise. They just seem to burn up better.

6. Count my blessings (at least 10) every day.

7. Listen to some music. I will get on a kick and listen to the same songs but there are some that always it the sweet spot, particularly my running playlists. I used to name my playlists for the race I was training for or a goal that I wanted to achieve.

These 7 points helps me stay on track… or get back on track. As you can see they are a blended combination of eating, exercise and motivation. I’m sure I could list 7 more, but these are my usual “go to” basics.

What are your basics? Leave a message below or shot me an email at Chris@BecomingELLi.com.

UPDATE: Less than an hour after posting I was thinking… why didn’t I include tracking and accountability? Good question…

Walking the Dog Adds Lots of Steps

I just realized that walking the dog adds lots of steps to my daily totals. I knew that, of course, but when I looked at my Fitbit numbers, there was the proof.

Remember when I got my puppy, Penny? I wrote about her last summer when she was a baby. Now Penny is about six months old so still a puppy but she’s more like a pre-teen these days. She keeps me very busy with taking things out of her mouth and stopping her from chewing on things.

My expensive She Fits sports bra no longer zips because Penny chewed the zipper. She also got the back of my newest pair (and most expensive) pair of running shoes. Fortunately, I caught her with the shoe early enough to save the shoe.

Walking the Dog Adds Lots of Steps

As Penny has gotten older, her ability to walk has obviously increased so she requires longer walks. Besides chewing on things, she also requires more exercise. I’ve noticed that my daily steps increased once Penny came into the house. Penny became a member of the household in mid July of this year and you can see that my monthly steps have consistently increased as she’s gotten older.

The thing about having a dog is that she has to go out for a walk regardless of the weather. We had our first real snowfall recently and Penny was enchanted. She loved the snow and frolicked the whole time we were out walking. It actually made having to be out walking in the snow a lot more enjoyable. I would not have gone out first thing in the morning for a walk in the snow.

Walking the Dog Adds Lots of Steps

Walking in the cold is not great but I make a point to carry gloves and a hat so that if it’s colder than I expect, I’m prepared. This comes from not being prepared when it was cold and wet.

I’m hoping that Penny will eventually be able to run with me. I know that’s going to take some training but it would be fun to have a running companion.

Life with Penny is turning out to be a lot of fun and a lot of steps.

Making Coconut Yogurt in the Instant Pot

I figured out how to make coconut yogurt in the Instant Pot. It’s easy though it does take some time.

I’ve been trying to eat more fermented foods and when we talked with Christine Bailey on a recent podcast, she said yogurt was a great option. She also recommended coconut yogurt if you are not eating dairy.

I’ve been avoiding dairy for a few months because a doctor suggested that some of my skin problems might be related to dairy. Like most of us, I  love certain dairy products. Cheese, sour cream, cream in my coffee. I love all of that. But eliminating all of that has helped me feel better.

I do like yogurt. For a long time my go-to breakfast was plain Greek yogurt with berries and some granola on top. It was a tasty breakfast.

Buying coconut yogurt in the grocery store is extremely expensive. And it all has some kind of sugar added to it period at least that seems to be what’s true at my local grocery store. No one seems to make plain coconut yogurt.

I suddenly remembered that my instant pot has a yogurt making option on it so I decided to try making my own coconut yogurt.

Making Coconut Yogurt in the Instant Pot

My first batch turned out pretty well but was rather runny. Coconut milk apparently is lacking some protein or something that causes milk yogurt to thicken. I ended up mixing it in my Vitamix with a little bit of vanilla extract and raspberries. It was a lot like the drinkable yogurts that you can buy in the grocery store. It tasted really good.

Second Batch

My second batch is a bit thicker because I added a teaspoon of unflavored gelatin to it.

As the starter for the yogurt I used plain Greek yogurt. I know it’s dairy but I figured the small amount that I added to the coconut milk is not going to hurt me. I’m not allergic to dairy. I’m just trying to avoid it to help my skin heal.

You can buy yogurt starter but buying a small container of yogurt at the store is a lot cheaper and easier. Now that I’ve made some yogurt, I can save a bit of it to use as a starter for the next batch. It’s like having a sour dough starter. Once you have some, just save it and keep using it as a starter.

Coconut Milk

I used a can of organic full fat coconut milk. I don’t know how light coconut milk would work. Definitely avoid the coconut milk that comes in a cardboard container. You want to use the canned milk.

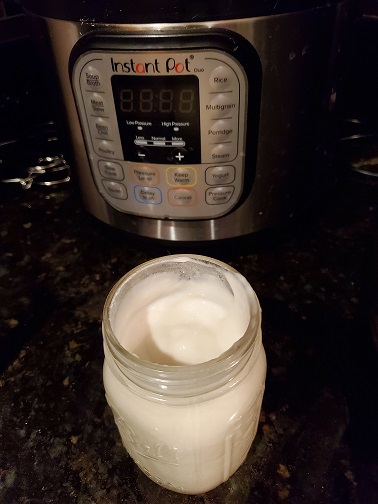
I added the yogurt starter and a teaspoon of the unflavored gelatin and whisked it well. I then poured it into a mason jar, which I put in the Instant Pot. Then, I added some water to the bottom of the pot, put the lid on, and then set the yogurt time to 24 hours. I figured that would let it really ferment.

After the fermentation ended and I removed the jar from the Instant Pot, I put the yogurt in the refrigerator to let it set for several hours.

When the yogurt was set, I stirred the yogurt thoroughly.

The coconut yogurt does not have a strong taste of coconut. As a treat or for my breakfast, I add some berries and a little vanilla extract but I am not big on adding sweetener. You certainly could if you wanted. You could also sprinkle some granola or chopped nuts on top for crunch.

Recipe for Coconut Yogurt in the Instant Pot

This is so easy, you’ll love it.

Ingredients

1 can of full fat coconut milk

1 tablespoon of Greek Yogurt with active cultures

2 teaspoons of unflavored gelatin (just use 1 teaspoon if you don’t want it too thick.)

Directions

Empty the coconut milk into a small mixing bow.

Add the Greek yogurt and the unflavored gelatin. Whisk well.

Pour the mixture into a mason jar or small bowl.

Place the jar in the Instant Pot.

Add one cup of water to the Instant Pot.

Select yogurt on the Instant Pot and then select time. I went with 24 hours to get a tangy flavor.

When it finishes, shake or whisk the yogurt well, cover, and put in the refrigerator. Wait several hours or even a day and then mix well again. Enjoy!

Notes

Make sure your mason jar or glass bowl are clean. I washed the jar in the dishwasher immediately before using.

Many yogurt instructions say to boil the milk first but because I was using canned coconut milk, I determined that was an unnecessary step. If you decide to do this, be sure to boil the coconut milk first and then let it cool before adding the Greek yogurt and gelatin.

If you make coconut yogurt or any kind of yogurt in your Instant Pot, let me know how it turns out.

Pursue Your SPARK with Heike Yates

Episode 71

Download | Play in New Window
Please Subscribe: Apple Podcasts  (iTunes) | Google Podcasts | Amazon Podcasts | Android-Google Play | Audible |  Stitcher | Player FM | Castbox | Tunein | Spotify | RSS

In episode 71, Jill and Chris talk with Heike Yates, a fitness and nutrition expert who has helped women worldwide to stay fit for over 30 years.

Her passion is empowering women over 50 to say YES. I CAN. She helps them to take back their health and strength by showing them how fitness, nutrition, and mindset strategies combined create a winning team.

Heike has developed a reputation for creating real-life solutions and lasting results. She is the creator of Pursue Your Spark, the 4 Week Lean Out Program, and host of the Pursue Your Spark podcast.  Heike is also a body builder, an Ultra Marathon runner and completed an Ironman Triathlon.

We talk about the five parts of her Pursue Your SPARK program. Each letter in SPARK stands for S=scan, P=plan, A=action, R=roadblocks, K=Kickass. We discuss the mental aspects of fitness along with nutrition and exercise. Heike talks about how to incorporate little changes into your week. She suggests that you start today. Seize the day by repeating a repeatable process and you’ll consistently get results.

She has many fitness and nutrition certificates including:
* American Council on Exercise (ACE) Personal Trainer certification
* Pilates Method Alliance (PMA) Pilates
* Precision Nutrition (PN) Nutrition Certification Level 1
* Road Runners Club Of America (RRCA) Certification
* Pink Ribbon Program
* Pilates Breast Cancer Coach

Website: https://heikeyates.com
Podcast: https://heikeyates.com/podcast

Heike offers a Free 5 For 50 Kickstarter Guide For Women 50+ on her website (look on the media kit page near the bottom!)

Vaccines and Shots to Avoid Illness

Vaccines have been in the news this past week. Different companies announced early results from tests on their vaccines to fight COVID-19 (Pfizer and its German partner, BioNTech, and the other by biotechnology firm Modern.)

It was about this time last year when I got a flu shot. And this past week I got my flu shot, so now two years in a row I got the flu shot. With almost every news story about COVID-19, illness is top of mind.

Just a few minutes ago, my daughter texted me and my husband about getting a pneumonia vaccine. Neither of us have had that vaccine, but perhaps we should. The way I understand it, there are three causes of pneumonia (viral, bacterial and heart-related) and the shot protects from viral.

In August I got the Tdap vaccine. It’s an every 10 year shot to protect from Tetanus, diphtheria, and pertussis (whooping cough.)

Flu shots and vaccines are definitely on my mind.

A few years ago I had two friends, both in their 40’s who had terrible bouts with shingles. At the time, I wanted the shingle shot. I asked at two different places (a clinic and my doctor) but both said that I was too young (under 60) and refused to give me the vaccine.

Now that I’m over 60, I still don’t have the vaccine, but have it on “my list” of things to do for my ongoing health. The CDC now recommends the shingle vaccine when you turn 50 years old.

With the pandemic on my mind so much this year, it seems like I have said “When COVID is over, I’m going to…” so many times. As of today, there are 182 vaccines in development to stop COVID.

Have you had the flu shot? Shingles? Pneumonia? Are they part of your healthy plan? What are your thoughts about vaccines to stay healthy with vaccines?

Miso Ginger Noodle Soup

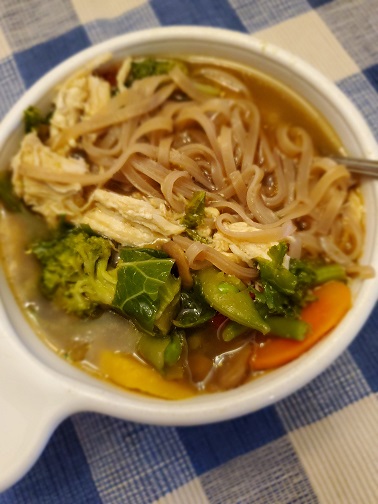
It’s fall here in Ohio and my heart has turned to soup. My Miso Ginger Noodle Soup is a great soup and very easy because I used convenience foods to make it. I know we’re always talking about not using prepared foods but I think this worked out well.

The miso-ginger stock that I used was something I bought at Trader Joe’s. It’s fantastic. I used to buy regular miso there but they no longer carry it. (At least right now. You never know what they’ll carry or discontinue.) I had intended to make my own miso stock but this was convenient and tasted great.

I had a bag of frozen stir fry vegetables so I decided to use that. Rummaging around in the refrigerator uncovered some cooked chicken that was ideal to add to the soup. Finally, I had some rice noodles in the pantry that I decided to include.

Miso Ginger Noodle Soup

This soup is fast and easy to make.

Ingredients

1 cartoon of miso Ginger broth ( I bought this at trader Joe’s but you could of course make your own broth.)
1 square Vietnamese brown rice noodles
3 cups Frozen stir fry veggies (whatever you have on hand works)
1 cooked boneless chicken breast, chopped or shredded
Dash Sesame oil (optional)

Directions

Pour the whole carton of miso ginger broth into a large saucepan and place on medium heat.

Add the frozen stir fry vegetables and kale and bring to a simmer.

Simmer for several minutes, until the vegetables are heated and the kale is wilted.

Add the cooked chicken and cook until heated through.

Cook the rice noodles according to package directions. Stir the dash of sesame oil over them for a bit more flavor.

Put some noodles in the bottom of a bowl and ladle soup over them.

Enjoy!

Notes for Making Miso Ginger Noodle Soup:

You could use whatever vegetables you have on hand. The stir-fry vegetables worked great.

Adding some sauteed onions would be fantastic.

If you use spinach instead of the kale, add the spinach at the very end since it takes much less time to wilt.

I recommend cooking the noodles separately so that if you have leftovers, the noodles won’t turn into mush.

Let me know if you make this. Share a photo if you have one.

« Older posts Newer posts »

© 2026

Theme by Anders Noren — Up ↑